What is a RAW photo editor and why do I want one?
The reality is that a RAW image editing workflow using a RAW photo editor is one of the best ways for you to have complete control over your images. This is especially true for wedding photographers shooting uncontrolled events, where rule number one is to get the shot, and rule number two is to get a better shot. Even the most seasoned photographer will choose an authentic moment over perfect camera settings, when push comes to shove.
I’ve always felt that getting it right in camera is the most important component in creating great images. Too often you hear people say, “You can fix that later.” Relying on post production to save an image (because of laziness or poor technique) is different than enhancing or fine tuning what’s already there.
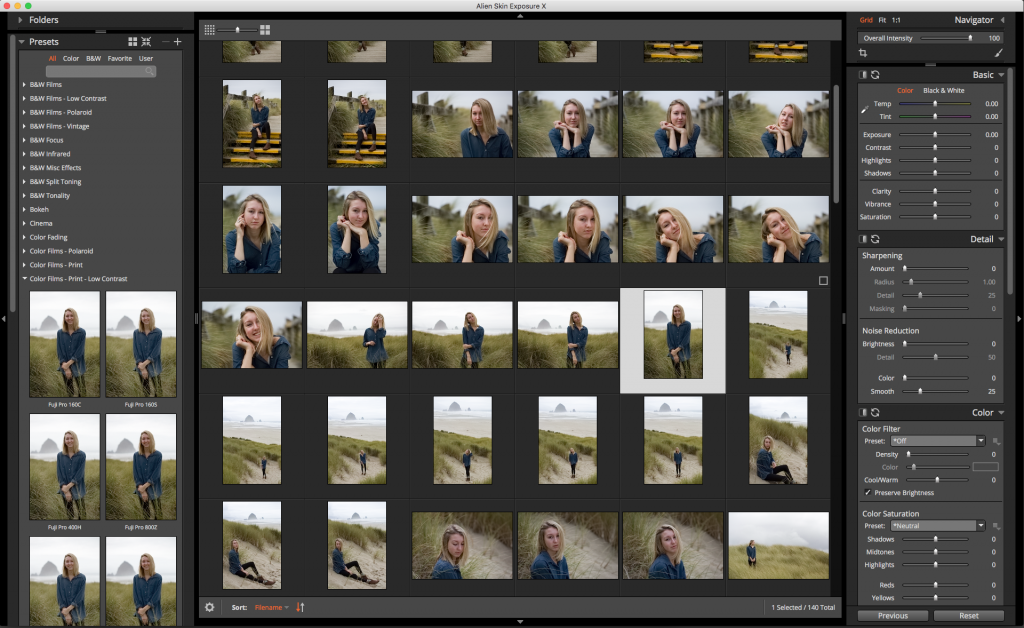
This is the Exposure X workspace. Fully customizable. Work the way you want.
RAW files give you far more room to make adjustments in post, and won’t introduce the artifacting that you encounter when you push a JPEG too hard. Why is that, you ask?
Basically, a RAW file is the unprocessed data captured by the camera sensor that hasn’t been converted by the camera’s on-board microprocessor. Think of it as a digital negative.
Shooting JPEG means the camera locks in everything at the time of capture (exposure, white balance, contrast). This can be a problem, for example, if the color temperature on your camera is set to auto white balance with multiple lighting sources and gets it wrong. Guess what happens if your scene has a dynamic range greater than the JPEG can handle? Your camera decides what to keep and what to discard. Most of the time, that doesn’t work in your favor.
Exposure, Contrast, Highlight, Shadow, White Balance, Color, Noise Reduction are just some of the adjustments you can make (after the fact) with a RAW photo editor workflow. RAW files contain far more detail than JPEGs. This means you have a lot of flexibility and latitude to make non-destructive adjustments with a RAW image editing program like Exposure X.
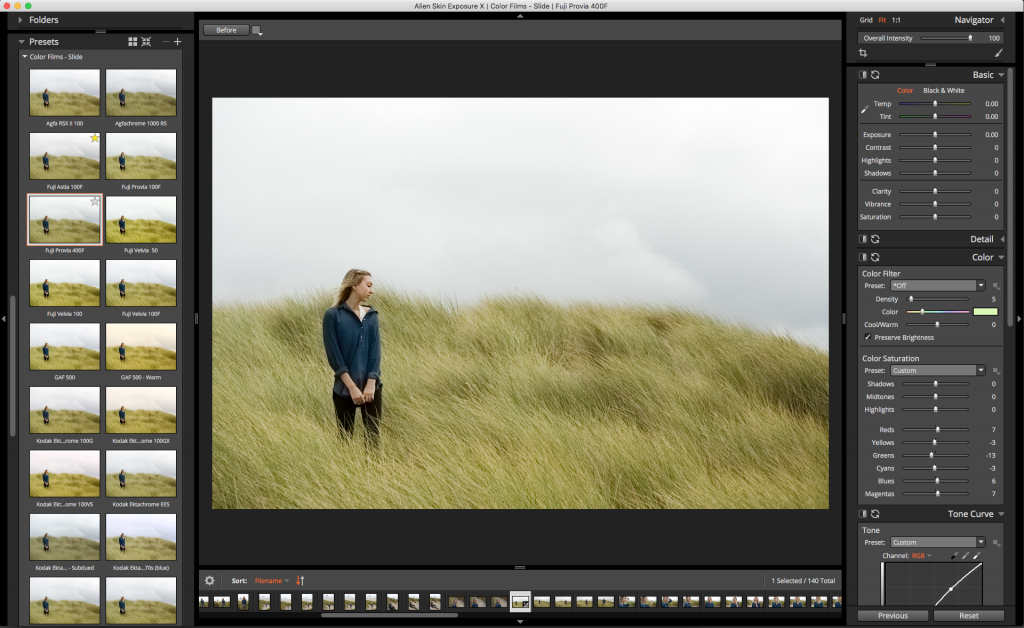
Original image as shot with the Fuji Provia 400F Color Slide Film preset applied as a base adjustment.
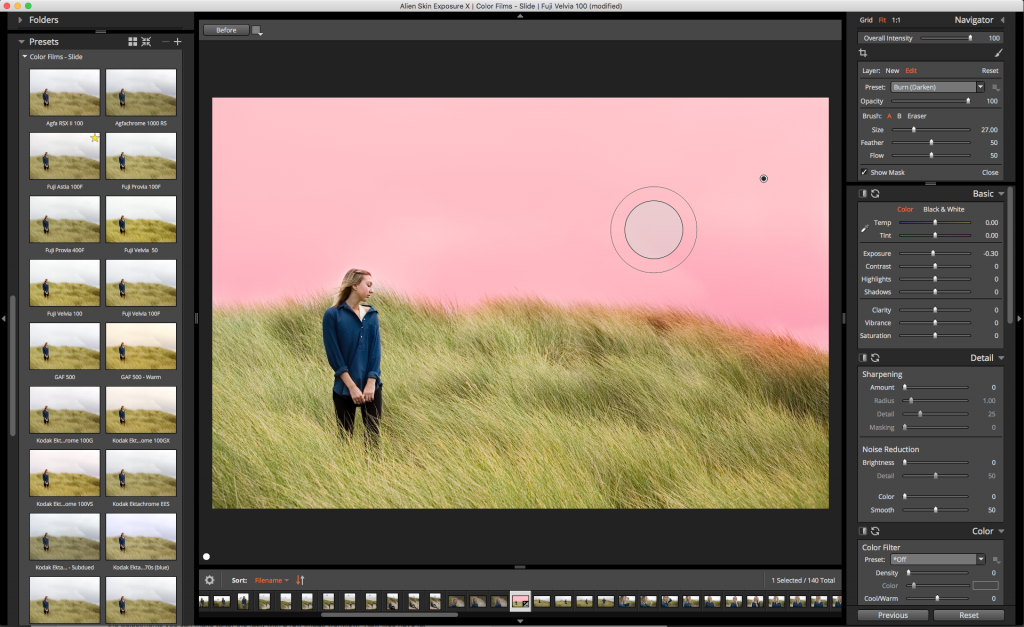
Brushes are a powerful tool to selectively apply artistic enhancements and custom adjustments.
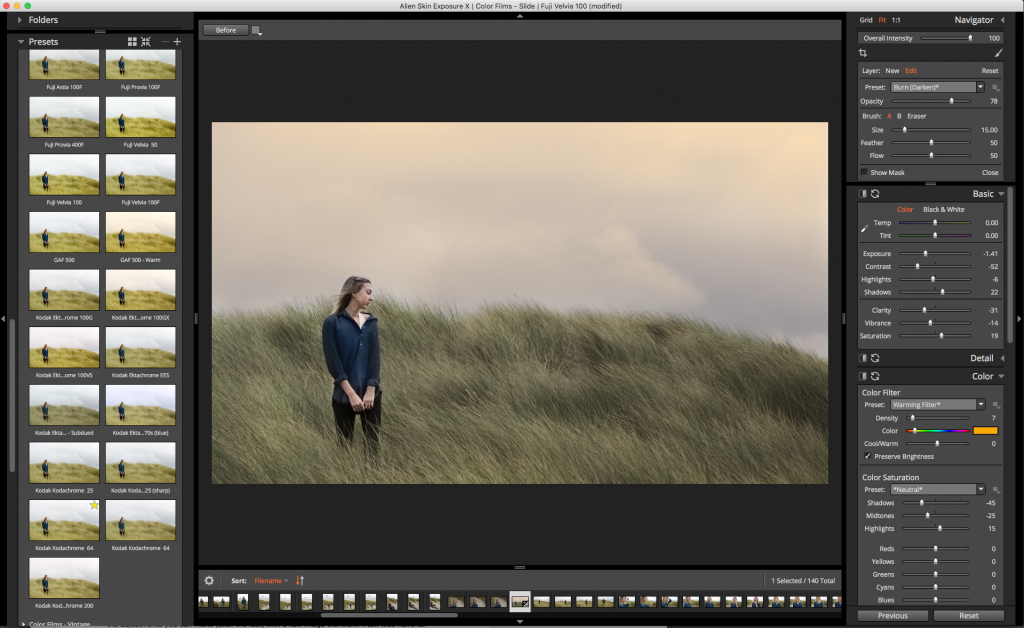
After selective exposure, contrast, color grading and film grain applied using the powerful masking tool. Now this has more of the soft color palette of color negative film.
Exposure X is a newly reimagined RAW photo editor representing over a decade of research and feedback from industry-leading photographers. If you haven’t taken a peek at this alien tech since earlier versions, it’s time to take another look. No longer relegated to being a Photoshop or Lightroom plug in, this (standalone) software deserves serious consideration for anyone wanting to speed up their RAW workflow and find inspiration.
Developed for a new generation of photographers wanting the vintage nuances of film and the performance of RAW image processing, it’s a RAW photo editor that’s designed around creativity, simplicity and flexibility.
Editing RAW files is quick and easy with the right RAW photo editor
Long before Photoshop actions, Lightroom presets and Instagram filters, there was this thing called film. And it was magical.
At Exposure’s heart is a huge library of beautiful styles (over 450) developed through careful research of modern and historical photographic techniques. A few of my favorites are in there (from back in the day). Kodak films like Kodachrome, Portra, and Tri-X (developed in Rodinal, the premier developing agent of black & white film), Fuji film color negative films, and black and white selections from Ilford. They even have Polaroid instant films.
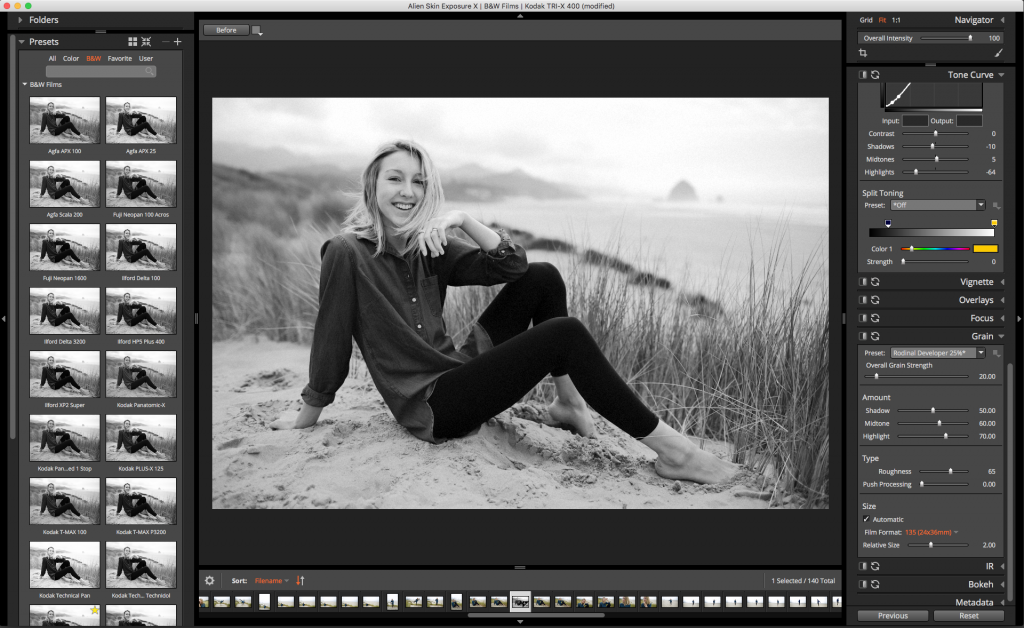
Kodak Tri-X developed in Rodinal is a classic combo. It’s also my favorite BW in Exposure X.
These aren’t your average film emulations. They are carefully crafted presets made to inspire you. You can even use them to make your own customized looks. All the editing tools you need are at your fingertips, from exposure and vibrance to noise reduction and sharpening. You can put finishing touches on your photos with Exposure’s Overlay panel, which includes realistic sun flares, vintage borders, and textures. Layering presets (new to Exposure X) gives you even more creative options to explore.
Like a vinyl record, there’s an organic essence to film grain created in Exposure. Move the grain slider and witness in real time how the grain “breathes.”
The previews are insanely fast. Mouse over a preset and the main preview image updates instantly to reflect the style you’re evaluating. Customize, save, and share your own presets. Then apply your custom presets with the click of a mouse.
Here’s a quick pro tip on removing a cyan color cast from a brides dress using targeted color channel adjustments:
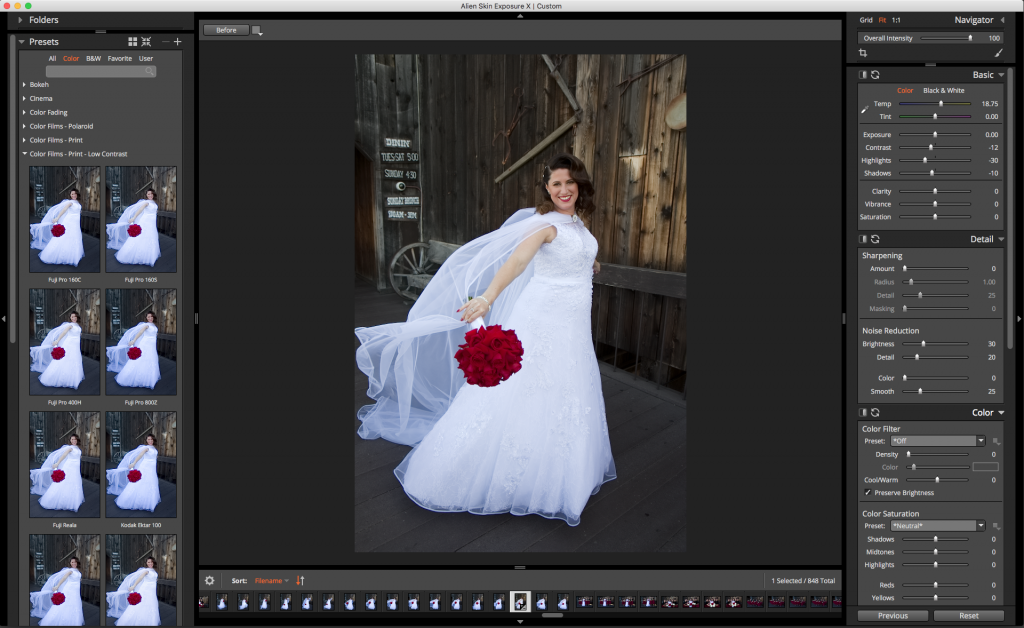
This is the original image of the bride with slight adjustments to contrast, highlights and a subtle warmth correction to make her skin tones more natural and warm.
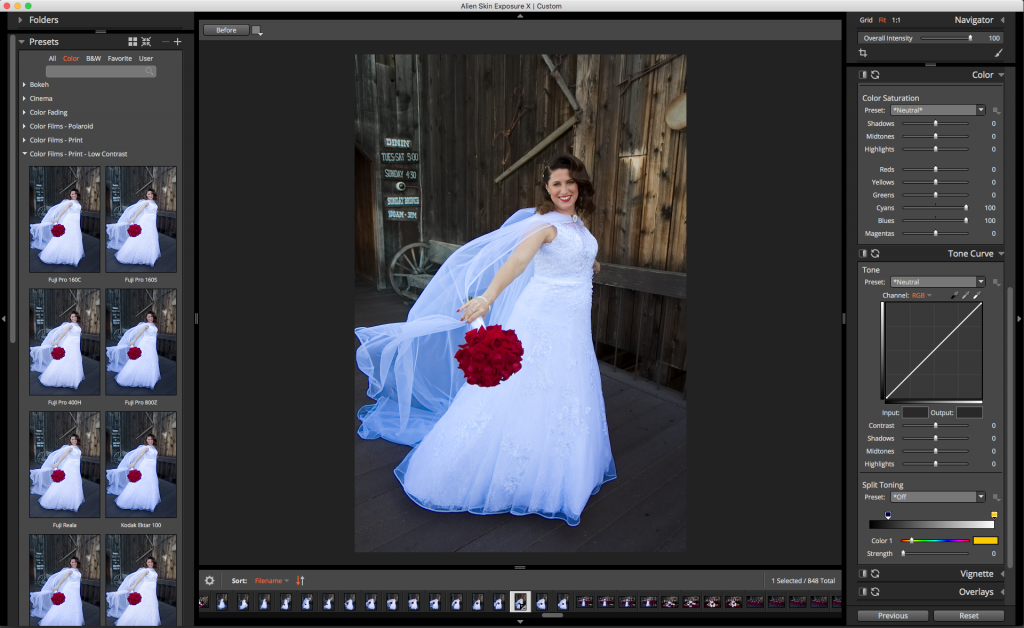
By maxing out the slider adjustments for the cyan and blue under the color settings, I can instantly see what areas in my photo will be affected by changing these settings.
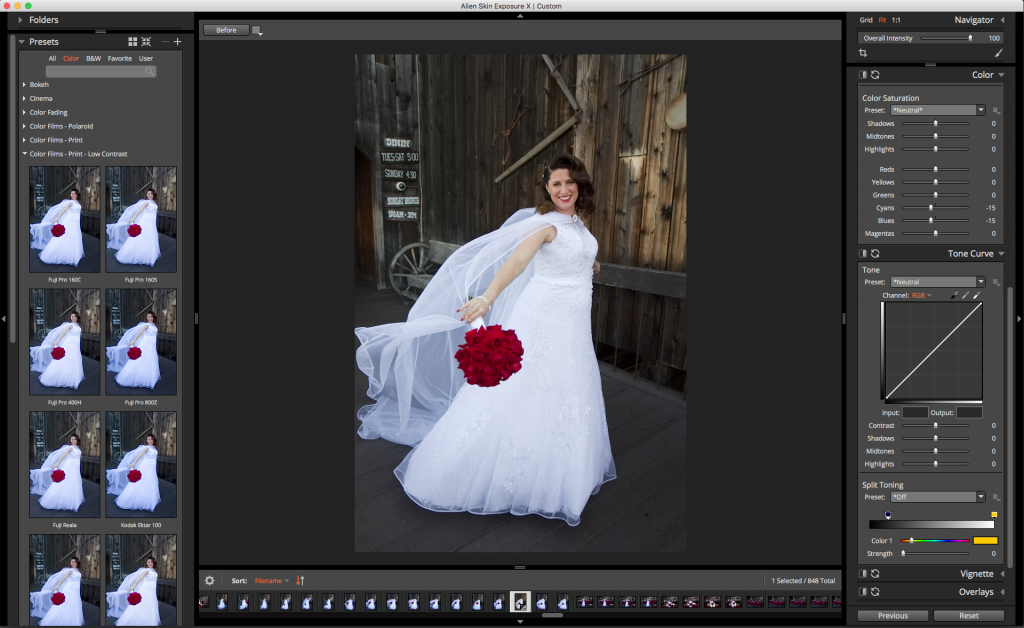
Now I can slightly desaturate those targeted colors from my image without affecting any of the other colors in the image. This has an added benefit of warming up the blue cast in the skin tones as well.
All of the settings to your images are saved as a small sidecar file in a folder that lives with your originals. No bloated catalog files taking up GigaBytes of hard drive space. Best of all, these changes are non-destructive, meaning you can always go back to your original file.
Whether you’re a casual shooter or a professional photographer, you’ll appreciate the effort and research that went into making Exposure X a very capable RAW photo editor. It enables you to work the way you want to work.
Try Exposure Today




Great article Randy.. I’m going to check out their RAW editor!
Thanks for the comment, Patrick!
I just installed Exposure X, 30 day trial, and am working my way through it. I chose two images to test this software on. A photo I knew was in need of serious fixing, and one that just needed a bit of adjusting.
For the most part, I have to say I do like it. I would like a few more options with the Brush tool, other than the few that are listed under it.
The “Film” selections are fantastic. Finished product actually did look like it was Kodak Ekta. Really like the non destructive editing.
Thanks for sharing, Sandra.
One of the great things about Exposure is the ability to customize it and make it your own. Any effect, or just part of an effect, that you make can be saved for use in the future. If you just want to save a new preset for the brush tool, you can very easily. All you need to do is press the button marked in the image below on the brush tool panel. This will record any of the settings that you adjusted to make your brushing effect.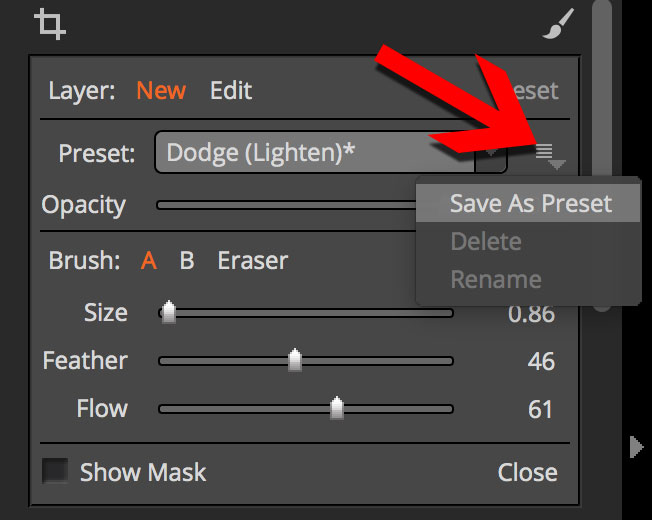
I know about that, but I meant was I would like to be able to use the brush to enhance details in one small area without having to make one. The brush tools are limited to what is in that drop down menu, unless they’re created. This is no real hardship but for new to RAW editing people would find them a bit limiting and making one a bit daunting(I have already created a Preset called “Details” so I can do what I described above)
And another issue: chromatic aberration/lens correction. I’m still trying to finagle a way to get rid of chromatic aberration (purple, red or blue fringing) If I try to reduce the fringes by color, the image gets washed out. Any suggestions on how I could go about this without fading the image? Any advise would be very helpful.
Don’t get me wrong, Exposure X is a great raw editor, and an outstanding program. Used as a stand alone, you can save the edited image as a high res JPG, so you can open it in any photo editor, and even with an older version of Adobe Camera Raw to remove the color fringing. :)
Hi Sandra,
Oh, I see. I’ll mention adding more preset options in the brushing dropdown to the development team.
Exposure doesn’t have automatic features for correcting chromatic aberrations. It’s something on the roadmap for a future version. With Exposure X, you could desaturate specific areas with the brush tool. Have you tried that?
Jimmy –
I’m with Sandra on this. Chromatic aberration is really a must have tool option for those who work in color, with even many high-end lenses suffering was quite noticeable color aberrations. Correction needn’t be “one-click”, so don’t get hung up on implementing it that way. A manual slider will work just fine!
Thanks for commenting, Mike. I’ve logged your feedback for the design team.
While we’re on the subject. If you have example images that have noticeable chromatic aberration issues, we are always in need of images to use for testing. Could you please send a few over to our support team? Here is a link to get in contact with them. Thanks!