
At the heart of Exposure is an extensive library of useful presets. There are two main types of presets. Creative presets apply film emulation or artistic looks to images. Workflow presets enable quick access to frequently used operations such as setting the size and file type of exported images. The article below is a guide for managing presets in Exposure.
Creative Presets
A creative preset is a set of adjustments that apply a specific look to a photo. An example is one of Exposure’s film emulation presets. Each preset includes adjustments to a number of parameters, such as saturation, color balance, sharpening, grain, and more. Some presets include several layers for more advanced techniques. Tour the many presets available in Exposure in our Applying Film Looks video.
The creative effect presets in Exposure are located in the Presets panel. Selecting a preset from the presets panel applies it to your current photo. Any editing adjustments made after the preset is applied will only affect the current image and not the preset in the library.
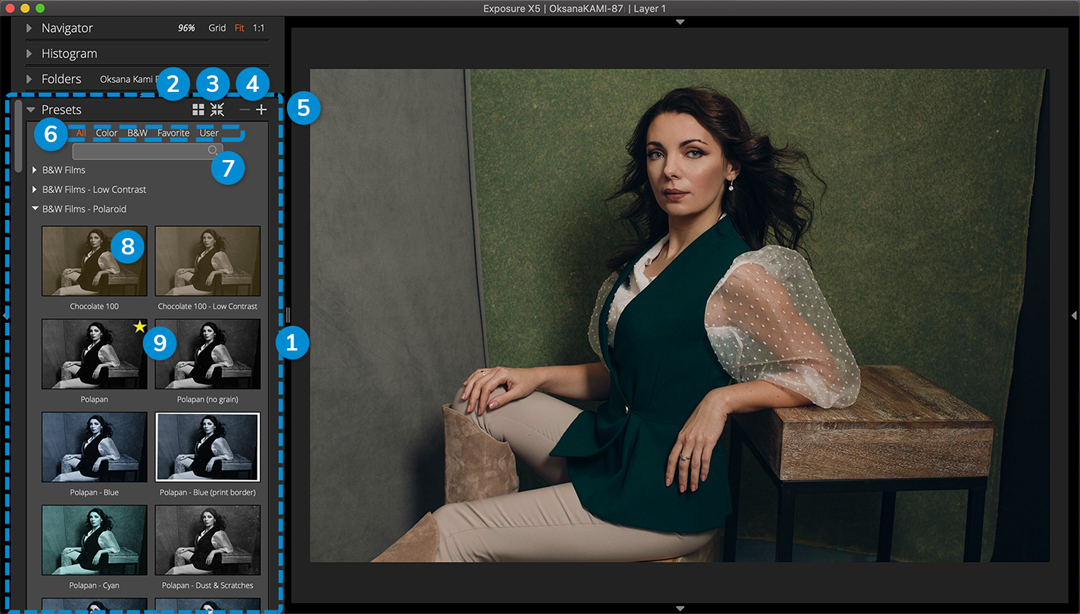
1 – Presets Panel
2 – Preset Display Options
Switch between one, two, or three columns of thumbnails. The compact list view only displays the preset names.
3 – Collapse/Expand All
Open or close all preset folders.
4 – Delete Preset
Remove user created presets. The factory presets that ship with Exposure can not be deleted.
5 – Save Preset
Save current settings as a new user created preset.
6 – Preset Filters
Sort the categories displayed using these options.
7 – Search Bar
Enter text to quickly search the preset name, category, and description fields.
8 – Preset Thumbnail
Small preview of the photo being edited with the preset applied. Note, these thumbnails do not include editing adjustments made to the image.
9 – Favorite
Designate favorite presets by clicking the star icon.
Creating Presets
Customizing presets enables you to design a creative style that you can reuse. They are a great way to achieve a consistent look across multiple photos. Get started creating a custom look by selecting a built-in preset and making modifications, including adding multiple adjustment layers. When your edits are complete, define a new preset with the plus button on the Presets panel or with ⌘+S on Mac or Ctrl+S on Windows.
Adding a descriptive name is a good practice when creating presets. Organizing presets in categories, and adding informative descriptions are also helpful. Any details you include to describe the preset can be searched for later.

1 – Name, Category, Description
Enter details about the preset you are saving. The search bar in the Preset panel looks through these fields.
2 – Settings
Underlined checkboxes indicate there are adjustments made to those tools.
3 – Base Adjustments
Edits made in these categories apply to the entire image, but they don’t often translate to other photos in a batch.
4 – Layers
Select boxes in this section to include the adjustments from that panel as part of the preset.
5 – Apply to all layers
Select adjustment panels from all editing layers.
6 – Choose per layer
Select adjustment panels from individual layers for more control.
Selective Presets
Presets can be designed to only affect certain editing panels, enabling new workflow options. When a selective preset is applied to an image, only the parameters chosen when it was created will affect it. Underlined text in the Settings section at the bottom of the Edit Preset window indicates modified values. Panels without underlines do not contain adjustments.
If an empty option is selected, the default values on that panel will be recorded in the preset. When using multiple layers in a preset, the Choose Per Layer option provides detailed control over selecting the effects from each layer and panel individually. The same selection options are available when copy and pasting edits between photos. For more information and a demonstration, watch our Working with Presets video.
Managing Presets
Building a custom preset library is a powerful tool for developing creative looks. Your entire library can be shared between computers with a synchronized folder like Dropbox. This ensures you always have access to your favorite creative effects.

Open the Preferences to set the User Folder location. That is where Exposure stores its presets. Selecting a shared folder, like Dropbox, ensures your presets library is always up to date between computers.
Preset details can be modified from the right click menu. Changing the name, category, description, or deleting presets only applies to those generated by users. To make modifications to factory presets, save a copy of it and then make customizations.
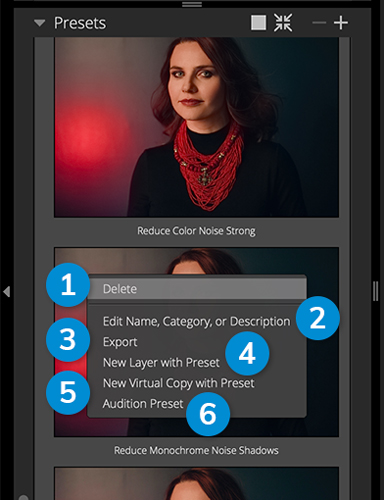
1 – Delete
Remove selected user generated preset from library. You can’t modify the presets that ship with Exposure.
2 – Edit Name, Category, or Description
Update the detailed information of user created presets.
3 – Export
Save a copy of the selected preset to share.
4 – New Layer with Preset
Create a new layer and apply the selected preset.
5 – New Virtual Copy with Preset
Creates a new virtual copy of the selected image(s) and applies the preset.
6 – Audition Preset
Opens audition mode and applies the selected preset to the image.
Exporting Presets
Presets can be shared with others using the same or a newer version of Exposure. Select Export from the right click menu. Exporting a preset will create a file with a F1s extension. You can send them directly in email or text, or post them online. Presets can include custom texture overlays, however any overlay images will need to be copied separately to have them accompany the exported preset.
Importing Presets
If you download a preset made with the same version of Exposure, simply double-click the file to bring it into Exposure. The settings router tool will open to confirm when the setting was installed. Once it is installed, restart Exposure to access the new preset.
User presets from older versions may not work this way. Check out this support article to learn about how to update presets from older software.
Workflow Presets
Workflow presets store settings for non-editing operations. For example, exporting images use workflow presets for Destination, File Naming, File Settings, Metadata, and Image Size. The presets determine how the exported files are created and organized. Access the preset management options from the gear icon or open Preferences and choose the Export panel. Watch our Exporting video to learn more about creating and modifying export presets.
Camera presets are another example of workflow presets. They are used to assign DCP profiles for color correction to images from a specific camera model, lens, and ISO setting. When camera presets are set, and an image from a particular camera is encountered, Exposure will automatically apply the DCP specified. We demonstrate how to create and assign them in our Camera Profiles video.
The presets in Exposure play a huge role in keeping your photos consistent. And Exposure makes them simple to keep them organized.
Thanks for reading this guide. We hope you enjoyed it. Save a link to this article if you need a reference the next time you are working with presets.
Try Exposure Today


