
Customizing your photo editing workspace puts the controls you need at your fingertips, which speeds up your workflow. You can remove panels for controls you don’t use or relocate them to reduce distractions. There are lots of customizable aspects of the Exposure interface, which we discuss in this article.
Personalizing the Interface
Resizable docks appear along all four edges of the application window. Contained on the side docks are panels such as Folders, Presets, Basic, Color, and Tone Curve. The left and right docks are divided into upper and lower quadrants. Provide more room on the top or bottom quadrants by dragging the splitter. Moving the splitter to the edge of the dock will hide the quadrant.
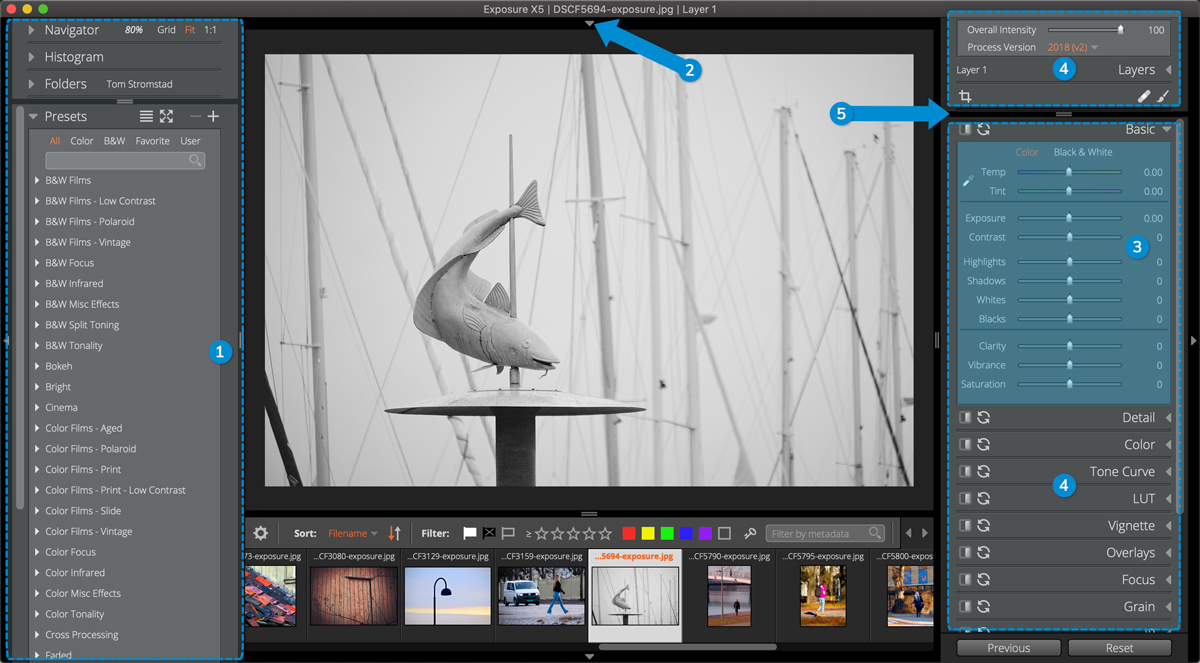
1 – Dock
Docks group all of Exposures panels.
2 – Dock Visibility Toggle
Clickable dock visibility icon for toggling auto-hide for the dock.
3 – Panel
Contains sets of related controls for a specific purpose. For example, access Exposure’s library of film simulation presets from the Presets panel, or adjust white balance, exposure, and contrast on the Basic panel.
4 – Quadrant
Resizable upper or lower section of the left and right docks.
5 – Splitter
Movable divider for resizing docks or quadrants. Click and drag anywhere in the divider to move it.
Customizing Panels
There are several specific tools for configuring the order and placement of the panels. Right click within a quadrant and choose the Customize Panels… option to access them in the Preferences pane.
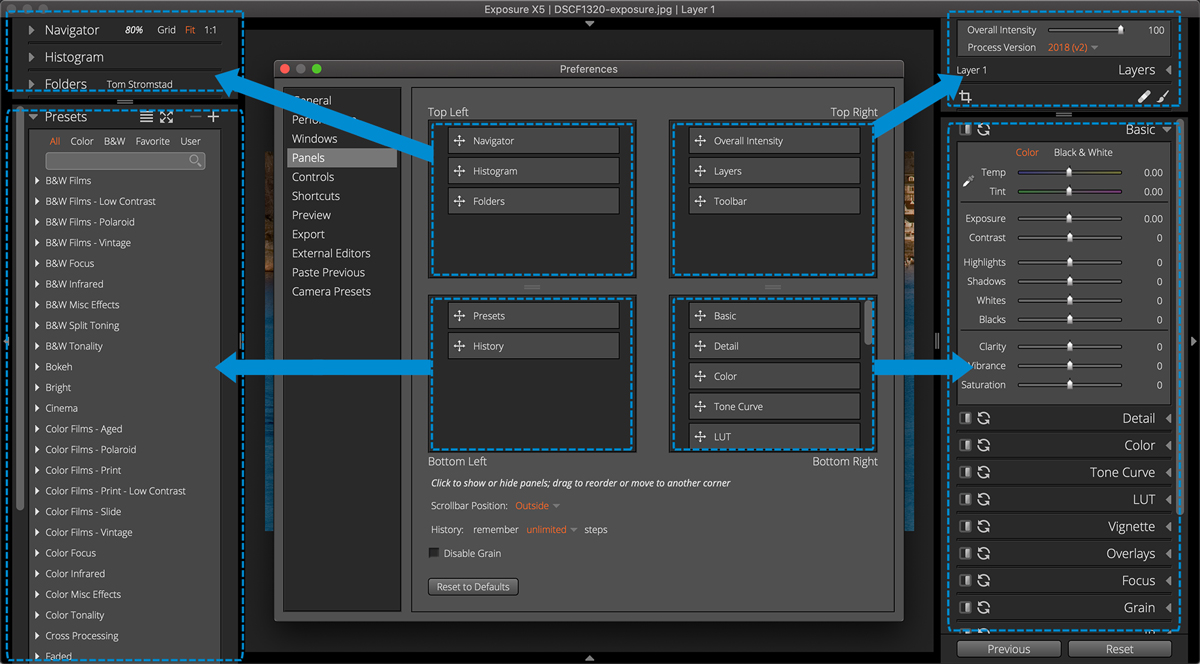
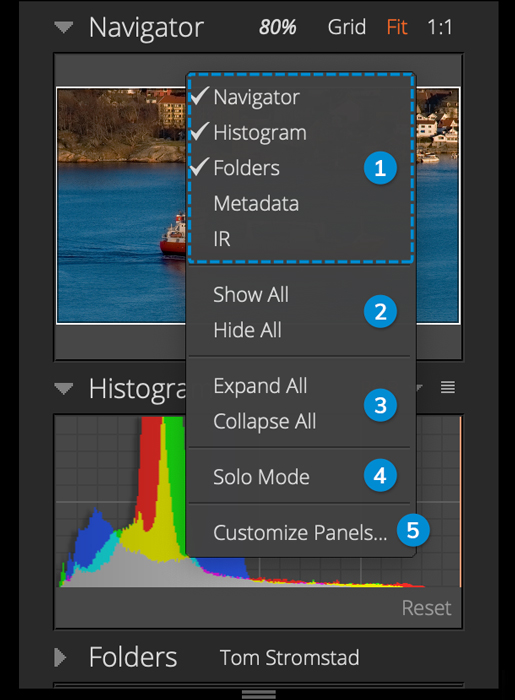
The quadrants in this view show the placement of panels in Exposure’s left and right docks. The panels within each quadrant can be moved to another quadrant, reordered, or hidden for your workflow needs. Click a panel name to toggle its visibility off or on. Hidden panel names will have a strikethrough. Drag and drop to change the order of the panels in a quadrant, or move them between quadrants.
Quadrant Controls
1 – Panels
Select the panel name from this list to toggle its visibility off and on. The check marks indicate if the panel is hidden.
2 – Show all / Hide all
Make all panels in the selected quadrant visible or hidden.
3 – Expand all / Collapse all
Close all panels in the quadrant or disclose all panels.
4 – Solo Mode
Only allow one panel to be open at a time within the quadrant. A great option for smaller monitors.
5 – Customize Panels…
Opens the Preferences pane for rearranging panels control options.
Managing Docks
There are docks attached to each side of the Exposure application window. Docks are where you can find all of the controls for organizing and editing images. Each dock can be hidden from view to eliminate distractions and give more room for your image. When hidden, the docks can still be accessed by moving the cursor near the window edge. When you move the cursor off of the dock, it will hide again. Lock them open with the dock visibility icon at the edge of the screen.
Keyboard shortcuts make operating the docks seamless. Press TAB to toggle the visibility of all docks locked open. Toggle individual docks closed and open by holding down ⌘+Shift, then pressing the corresponding arrow. For example, to hide the right dock, use ⌘+Shift+→.
Multiple monitors
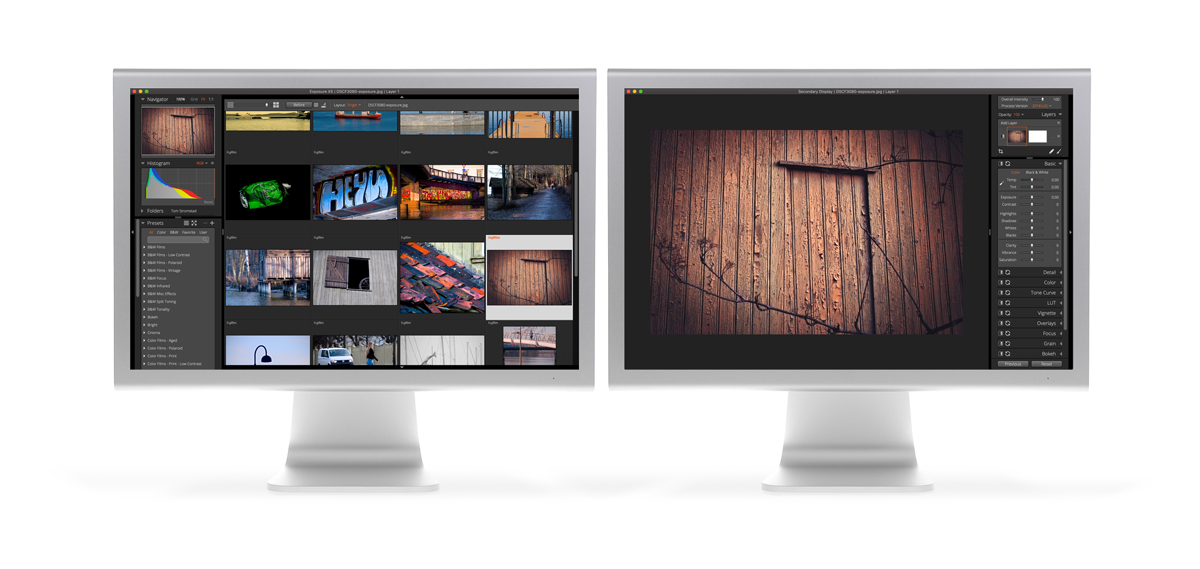
Adding a second monitor provides more area to work on images. Photos can be viewed at full size on one screen with the grid and the docks on the other. Open the secondary display window with ⌘+F11 or Ctrl+F11.
Each display window has a keyboard shortcut for full-screen mode. Press ⌘+F to make the primary display window full screen, and ⌘+Shift+F for the secondary display. The primary and secondary display windows can be moved between each monitor when they are not in full screen mode.
The docks can be relocated to the secondary display. To move docks between display windows, access the controls from the application menu. Select Window > Customize Windows. This opens the Window preference pane. Selecting the dock checkboxes will relocate the corresponding dock to the secondary display.
As you can see, customizing the user interface is easy to do, and it’s a great way to make your editing in Exposure more efficient. We hope you learned something in this article. Save a link to this page for future reference.


