
Exposure is capable of recreating a look made with other software. And it’s easy to do when you know the right process. In this article, the goal is to remake Lightroom processing in Exposure. We share lots of great tips for keeping the process simple.
Lightroom to Exposure
The Migration tool enables you to transfer images from Lightroom to Exposure. It automatically includes keywords, collections, and other metadata from Lightroom. The Migration tool does not turn your Lightroom visual adjustments into corresponding Exposure visual adjustments.
When migrating, also export a copy of adjusted images. This will export both a copy of the original image and a copy of the image with Lightroom adjustments applied to it. You can set preferences for the file, including file type, color space, and bit depth. When duplicating a look, you only need to study the image, not make adjustments, so a high resolution JPEG will work fine. You can learn more details about using the Migration tool on our support website.
The Right Tools
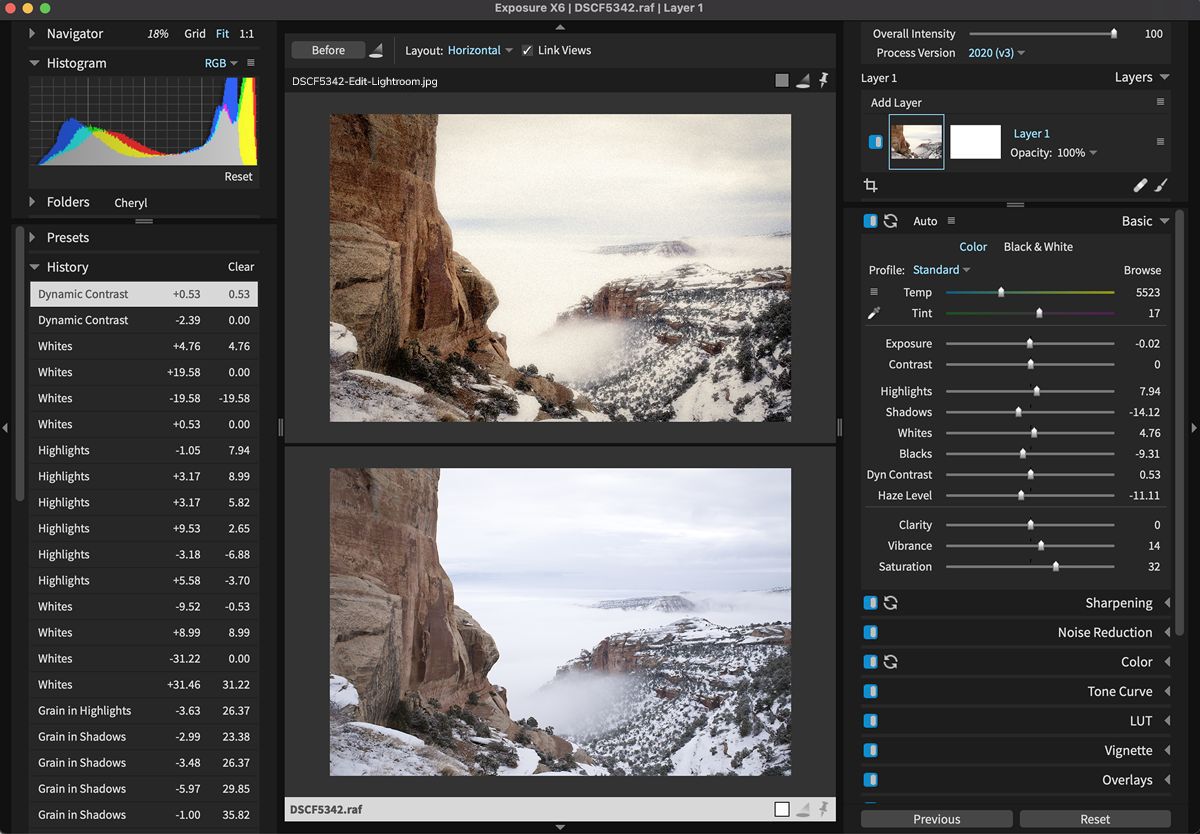
Placing the before and after photos on the screen in Exposure enables you to make adjustments with instant feedback as you dial-in the look. All photos in this post © Cheryl Ungar.
Once you have an unedited and an edited version of the photo you want to recreate, you can begin the process. There are a few features in Exposure that particularly make this process easy.
Side-by-side layouts show the differences between the look you’re remaking and the image you’re working on. Select horizontal for comparing landscapes, or vertical for portraits. You can also include other edited images in your view, such as quad view. When applying adjustments, the link views checkbox enables you to zoom and pan around all the images displayed on the screen at the same time. It’s especially helpful when replicating processing from other software. Our Comparing Photos and Presets video shows you how to use Exposure’s comparison views.
As you’re dialing-in a look, you may want to go back and change your processing. Use the History panel to step backward through your workflow. The editing history is automatically saved so you can always revisit each adjustment you made.
Exposure’s virtual copies enable you to experiment with variations of the look without filling up your hard drive with duplicate files. If you’re struggling to make a hue or tone match just right, try a different approach on a new copy. It may take several attempts at fine-tuning adjustments to match up with processing from Lightroom. Virtual copies enable you to make several options, compare them on the screen, and select the one that matches best. Check out our Virtual Copies video for more information.
Basics First
We are remaking a look, but before tweaking individual controls to make tones in the RAW image match up with the one you’re duplicating, first try the auto adjustments. It’s always best to use an image that’s sharp, well exposed, and contains lots of bold colors, bright highlights, and dark shadows. The auto adjustments apply intelligent edits to make your image appear that way. They can speed up your workflow significantly by setting the stage for detailed adjustments.
The controls on the Basic panel are where to start making refinements by hand. Remember to use Exposure’s keyboard shortcuts, particularly the modifier keys. They can help you keep focused on the photos rather than on the mouse. For example, when F is pressed, exposure is increased by 0.1. Alt+F will raise exposure by .01, which is a very small amount for fine control. Ctrl+F, on the other hand, raises exposure by 0.5. These key combos are particularly helpful. You can see the full list of keyboard shortcuts from Exposure’s Help menu.

Exposure’s auto adjustments intelligently developed the RAW file on the left as a first step in making it look like the finished image on the right.
Order of Adjustments
When applying adjustments to replicate processing from Lightroom, use one panel at a time. After you finish tweaking the adjustments, close the panel and move to the next. This is a great way to keep organized. Begin adjusting sliders at the top of the panel you’re working in and work your way down through them. The order of the adjustments you make can affect other controls. For example, exposure can affect saturation, that is why the Exposure slider is listed above the Saturation slider. If you adjust saturation first, then later you adjust exposure, you will need to go back and adjust the saturation again. Adjustments and readjustments is part of the process of duplicating a look, but following a top-down order will help make it quicker.
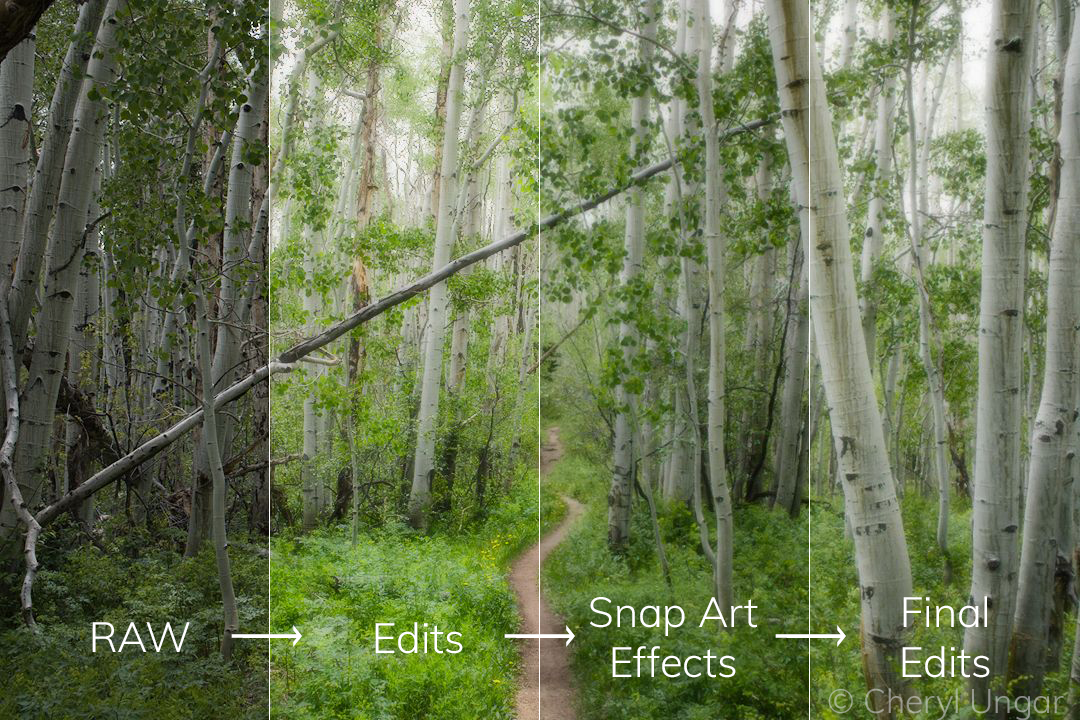
Left to right, editing progression from RAW. After subtle painterly effects are added in Snap Art, the coloring of the image was finalized with a few adjustments in Exposure to duplicate the look of the original image.
Partial Presets
There are lots of features in Exposure that make it simple to test different looks quickly. One of the most common are the presets found at the top of nearly every panel. Film grain is a great example, the presets on the Grain panel make an easy job out of finding the perfect style of grain that you’re trying to match. When applying grain, it’s important to visualize the effect at 1:1 view. That means there is no scaling happening to the image, so you are seeing it as accurately as possible. After finding the type, then concentrate on how strong and where the grain appears in the image.
Using Link Views, you can pan around the image with the spacebar. This will move both images together when previewing areas with different characteristics, such as highlight areas, midtones, and shadows.
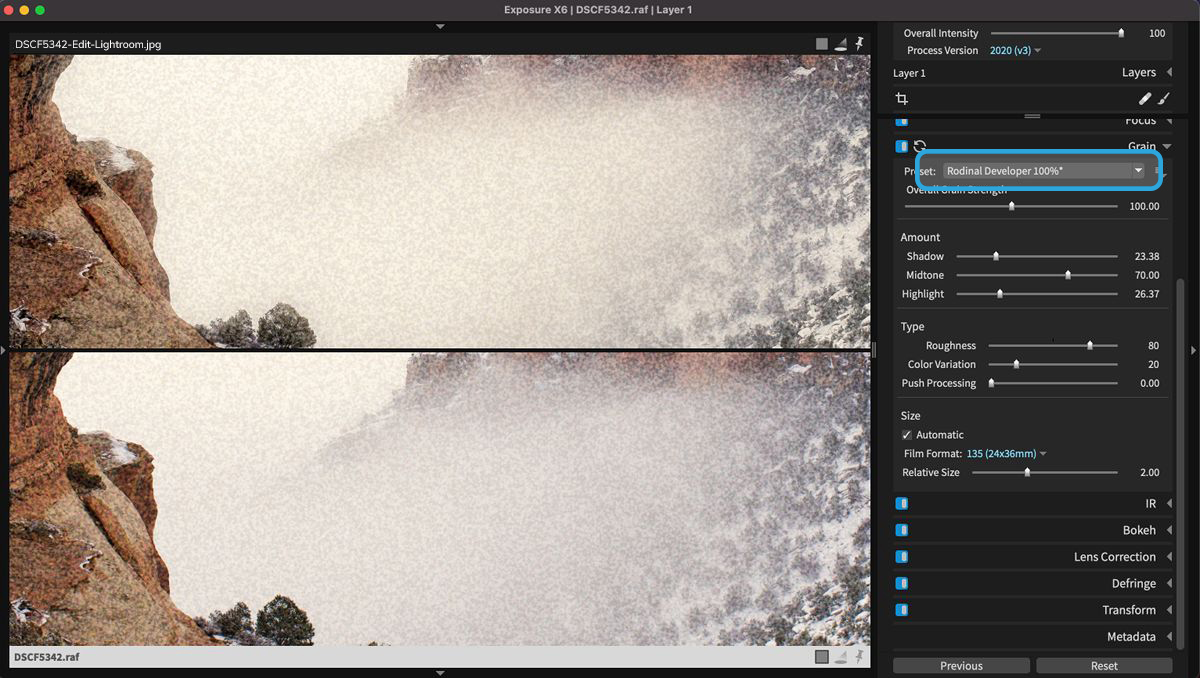
Controlling the appearance of grain is simple to do in Exposure. Simulating a specific grain type is too. The Rodinal Developer preset applied on the bottom image in this example does a good job of simulating the grain in the JPEG file on the top. The Grain preset is highlighted in this example.
Things to Avoid
#1. Don’t make, then unmake adjustments. Some of Exposure’s sliders oppose each other, and so the changes they make to the image essentially cancel each other out. An example would be increasing the Contrast slider on the Basic panel and then decreasing the Contrast slider in the Tone Curve panel. A better solution would be to readjust the Contrast slider on the Basic panel.
#2. Omit unnecessary controls. The fewer adjustments needed to replicate processing from Lightroom, the easier it will be to dial-in. Also, if you plan to save the looks as a preset to use again, make sure you exclude any extra tweaks. An example would be adjustments to blue tones on an image with no blue in it.
#3. Local adjustments and retouching too soon. When remaking a look from Lightroom, applying edits to specific areas usually takes place after the majority of the look has been remade. If you would like to save a preset from the look, you may want to include layers and even layer masks. You can reuse hand-painted masks or retouching with the spot heal tool, but it’s only useful in specific workflow scenarios. If the retouches are repetitive, like with images that are almost identical or if there are distracting sensor dust spots.
Conclusion
As you can see, there are several great features in Exposure that make easy work of recreating looks developed with other software like Lightroom. Exposure’s simple, straightforward workflow can quickly be picked up by those new to using Exposure, or to photo editing.
Try Exposure Today


