We’ve all used sharpening during post-processing before. It’s something as common as retouching red-eye or removing skin blemishes. Unfortunately, it’s commonly misunderstood. First, let’s get to know sharpening by answering a few basic questions.
What’s sharpening for?
Sharpening is a processing technique used to bring out detail and give your image presence. It’s primarily used to negate blurring effects that occur inside of the camera–usually caused by interpolation and the anti-aliasing filter.
How does it work?
Software detects transitions–edges–and amplifies the contrast to make them more pronounced. When applied correctly, sharpening will help your image pop. Above or beyond this amount is too much. If you can see the sharpening, it’s too much. Over sharpening is a common newbie photographer blunder. Be careful, and go easy on it.

Notice the brightened pixels in the oversharpened image.
Sharpening rule of thumb
Sharpen after you size your image for output, not before. If you are making a 24”x36” print, the sharpening amount will be radically different than if you’re posting a shot on Facebook. If you resize an image after sharpening, the tedious work you did to sharpen will get clobbered. First, size, then sharpen.
Photoshop Sharpening:
A lot of photographers use native tools in Photoshop to do their sharpening dirty work. Photoshop has a number of sharpening filters to choose from. They are clearly divided into two groups: generic and custom. Filters like Sharpen, Sharpen Edges, and Sharpen More are generic–meaning you don’t have any control over the sharpening they do.
The custom sharpening filters–Unsharp Mask and Smart Sharpen–give you adjustment parameters to customize the effect. Unsharp Mask applies sharpening in accordance to a threshold value set by the user. Smart Sharpen is similar, but it allows for you to designate what type of blur to remove such as Gaussian, Motion, or Lens. Gaussian blur is similar to a low-level softness introduced by camera sensors’ low-pass filter, so it’s the most common type.
Basic Sharpening Controls:
Let’s take a step further and talk about the sharpening settings, which are the Amount, Radius, and Threshold parameters.
Amount
This signifies the aggressiveness of the application, which is usually determined by a visual inspection. It’s recommended to confirm sharpening when viewing your image at a 2:1 or 1:1 ratio, depending on the output size. These magnification levels are more accurate because your computer isn’t randomly squashing pixels together. Make sure the math works out, first. When in doubt, use 1:1.
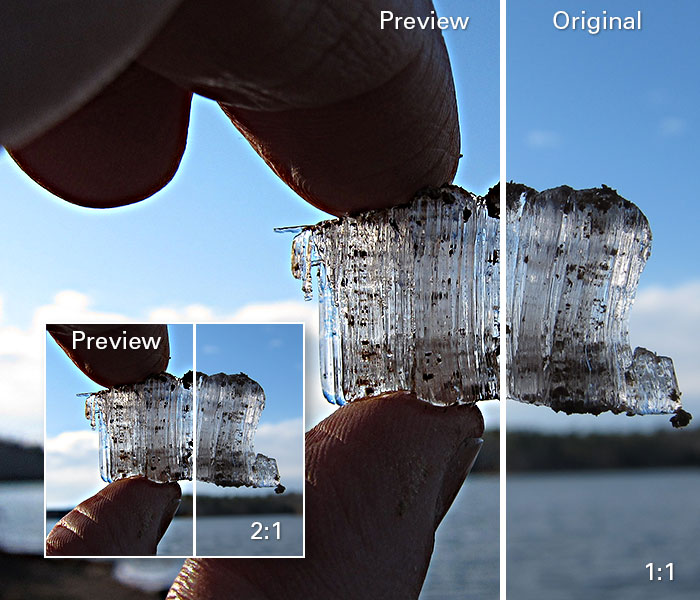
See how the sharpening renders differently when viewed at different sizes?
Radius
This controls the distance (in pixels) surrounding a given pixel to which the sharpening is applied. There are two schools of thought when it comes to proper sharpening. One side uses a large radius, the other–small. Using a larger radius usually allows for a stronger amount of sharpening to be applied with good results. On the other hand, the smaller radius sharpening technique is more precise, which can keep artifacting at a minimum. In either case, be careful with sharpening, overly-aggressive sharpening can ruin a photo. I advise to err on the side of safety. Use just enough to make the image pop.
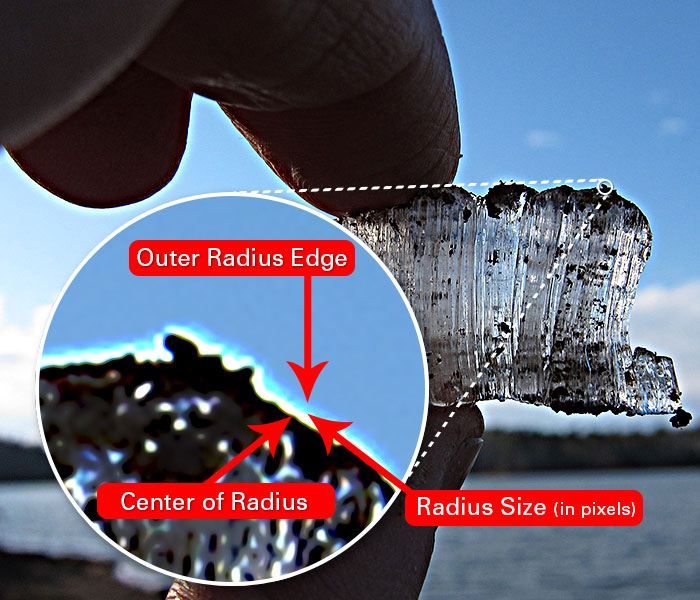
Threshold
This specifies a minimum amount of value difference between the center pixel and it’s surrounding pixels. A threshold value of 0 applies the sharpening to the entire image. The higher the value, the less of the sharpening you see. This is used to avoid sharpening smooth areas that may contain noise like sky.
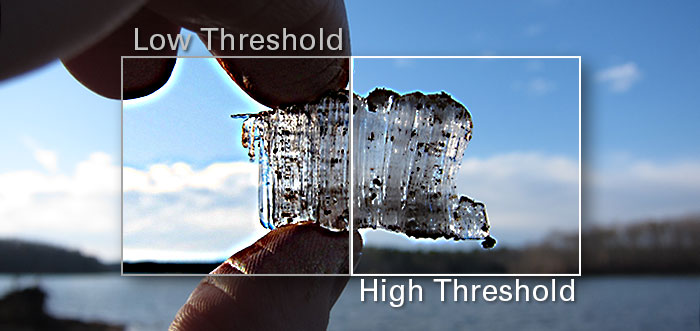
A heavy amount of sharpening was applied to this image for demonstration purposes.
These brief descriptions may sound like Greek, and that’s okay. Below are practical applications of these ideas in layman’s terms–mostly.
Lightness Sharpening:
Sharpening the Lightness channel is one of the most reliable sharpening procedures out there, but it’s a major pain in the butt with Photoshop alone. I use sharpening at output, meaning it’s one of the last steps in my image processing workflow. If I’m using Photoshop, I’ll have an image with dozens of layers, so my machine is running slow and, at times, it’s laggy. At this point I don’t want to perform a touchy adjustment like sharpening when it’s working like this.
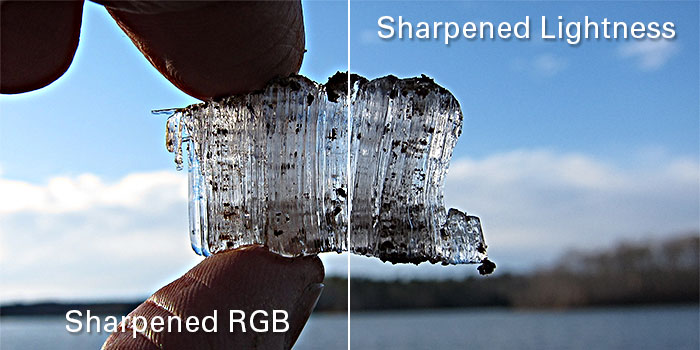
Easy solutions exist. I can: 1: Use Exposure’s sharpening, bypassing the Photoshop mode change work-around. 2: Use Blow Up to sharpen and resize my image for output in a single step. 3: Ignore the lagginess of my computer, and go through with the mode change procedure.
Easy Way #1 – Exposure:
Exposure performs 9 steps in Photoshop with one click. The Lightness Channel checkbox, on the Sharpening panel, designates the sharpening algorithm–similar to Photoshop’s Unsharp Mask–to apply to the lightness channel of your image. This makes sharpening adjustments only on the tonal values of the image, leaving the image’s colors alone. This produces crisp and clear sharpening.

Easy Way #2 – Blow Up:
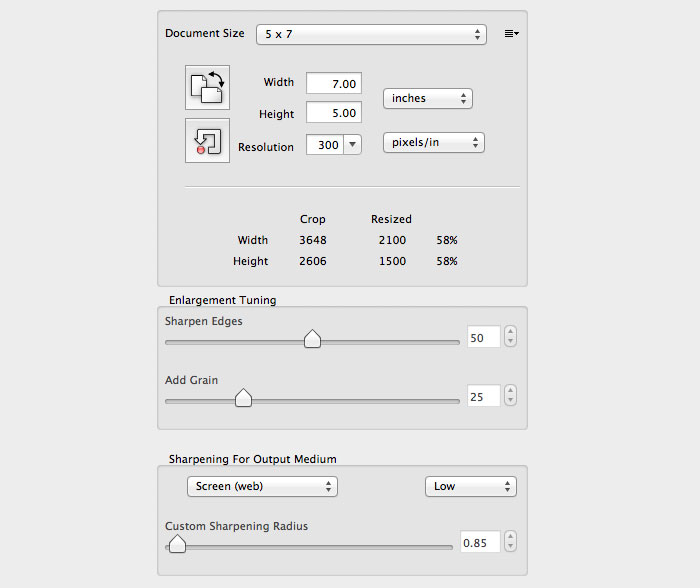
Blow Up is extremely easy to use. Just open your image and run Blow Up. Then, choose your output size from the presets. If you’d like more sharpening, you can add it with the handy sharpening sliders below, or again, use the presets. Click, click, boom–you’re done. The added value of Blow Up are the presets themselves. There are options that will automatically correct for blurring of different types, such as inks and paper types.
Way #3 – Photoshop:
When sharpening in Photoshop, you may opt to use sharpening while in RGB mode, but I wouldn’t recommend it, especially if you’re not a Photoshop guru. However, if you’re not intimidated by techie step-by-step procedures, here’s how:
-
Duplicate the image layer Cmd+J/Ctrl+J. If you’re using an image with multiple layers, use Cmd/Ctrl+Alt/Option+Shift+E (Duplicate visual and merge)
-
Go to Image>Mode>LAB
-
Don’t Flatten!
-
Select the Channels Tab on the Layers Panel
-
Select the Lightness Channel
-
Run Unsharp Mask (Or whatever you’d like)
-
Go to Image>Mode>RGB
-
Don’t Flatten!
-
Visually confirm sharpness is accurate
I prefer to forgo this procedure and use one of the other options above. If you aren’t happy with the sharpening, you have to trace back through these steps with better calibration.
In conclusion, we’ve talked a little about sharpening, what it is, what it does, how it behaves, and we’ve covered a couple of basic workflows. This topic is a gray area in terms of being a subjective topic. Although photographers, retouchers, and graphics gurus don’t see eye-to-eye on the perfect amount to apply, they all agree that too much is just too much.
You can use Exposure or Blow Up in demo mode. All of our products are fully functional during their trial period. Grab the installers and try the products out for yourself.
Try Exposure Today




I imagine this comment won’t get far, but I disagree with your sharpening ethos. I think you should sharpen before resize, caveats being sharpening and resize are done properly. I use a 3 stage High Pass method, then resize for the internet and I’ll take a pepsi challenge :D
Michael
Thanks for your feedback, Michael. As mentioned in the article, sharpening, as with a lot of areas in photography, is subjective and open to debate. As such, there is no right or wrong way to do it, just different ways. Thanks for sharing yours!
Interesting to read. I used to use lab mode a long time ago for this sort of thing because by sharpening on the lightness channel you could sharpen just the luminosity and not add color noise. But isn’t a lot more simple to fade the sharpening filter apply applying and use luminosity as the blending mode rather than switching color space?
Hi Dave,
Thanks for the comments. A workflow using layer based sharpening with the Luminosity blend mode will take care of color fringing issue, but it’s still not a perfect solution. Lightness and Luminosity assign levels of gray for each color. The formulas for assigning the gray values are similar but different in the end. In my experience, the Lightness channel yields slightly better results.
I’m going to play with it and do some comparisons.
Do you know what the color gamut differences between say pro photo rgb and lab are? I wouldn’t want to go back to lab if were more narrow, but you have me thinking. I don’t usually think much at this time of the morning either, lol.
Hi Dave,
The LAB color space includes all perceivable colors, meaning its gamut exceeds those of the RGB and CMYK color models. ProPhoto RGB includes about 90% of all perceivable colors.
To clarify, sharpening the color image and fading the Luminosity attempts to prevent the sharpening from affecting the colors, whereas LAB sharpening doesn’t sharpen the colors in the first place.
Hope this helps.
From your comment “I use sharpening at output, meaning it’s one of the last steps in my image processing workflow. ” I take itthat you do not believe that the multi-step sharpening workflow (capture, possibly custom, and output) outlined by Bruce Fraser as currently implemented in PhotoKit Sharpener 2.0 and Lightroom 5 yields a less desirable result than using A.S. Exposure 5?
Hi Ellis,
The multi-step sharpening process is a designed to customize sharpening for each image. It’s a longer and more involved workflow than a single-pass. With respect to time, sharpening at the end of photo editing is a better option when you’re in a time-crunch, or when you’re working with multiple images.
“The multi-step sharpening process is a designed to customize sharpening for each image. It’s a longer and more involved workflow than a single-pass. With respect to time, sharpening at the end of photo editing is a better option when you’re in a time-crunch, or when you’re working with multiple images.”
Not necessarily true, and totally untrue if you use Lightroom. You can set the basic capture sharpening parameters as an import preset and incorporating output specific ( size, resolution and type of reproduction, including glossy or matte paper if you’ll be printing) sharpening when you export is a click of a couple of buttons.
In Lightroom 5’s Develop module also has a feature that allows you do area specific intermediate custom sharpening and/or blur at various strengths.
Hi Ellis,
You make a good point, but if you’re not a sharpening whizz, this sounds like an intimidating process. The less steps needed, the better. After all, the article is about making a complex subject simple.
This tutorial is sooo appreciated, and the other perspectives are respected. For this question – let’s stick with Alien Exposure 4 please. (until I can find a discount code to get 5 :)
The majority of my work is portraits. So I create a copy – do any skin / under eye corrections, dodge and burn eyes, run portraiture, mask back the eyes, teeth, nostrils and what ever else I want sharper. Crop and then I go into Exposure 4 and play.
Okay – is my general workflow correct? (I will start saving a copy and then merge everything before I crop and Exposure?
another question is client goes – cool but I want this size! Then I’m trying to recreate everything I did to the 1st go round – quess I should save all my presets as per file name!
Always wonder if I’m working against myself? Thanks – Love this Exposure! “My artistic interpretation”
Steer me right if I’m cruising down a dead end!
Hi Jimmy,
I wondered why you fail to mention the sharpening tools in the ACR? I’ve been using a modest amount there then crop/resize wth Blow Up for output and I’m pleased with the results, both for web and print. I rarely change from the defaults in Blow Up.
Thanks, GT
Hi Grant,
Good question. ACR’s sharpening is a slightly different process known as capture sharpening. Sharpening can be done at this point if the images need it, but it’s a much different beast than sharpening at output. In my opinion, it’s risky. Over-sharpening at the beginning of the workflow can augment digital noise that remains unseen until you start manipulating the photo in Exposure, Photoshop, or other programs. Also, be aware that some raw processor applications will add sharpening even when the sliders are set at zero. If you choose to sharpen the raw file, I’d use preset settings per your camera model, but not much more.
ACR does have an output sharpening function, which is similar to Lightroom’s. I advise to reserve their use only if you are printing directly through these programs. Should you plan to perform other work outside of them, I’d stick to the advice in the article and wait until the end of processing.
Of course, this is just my opinion. ;-)
Hi Lana,
It’s good practice to save layered full-res files previous to sizing and sharpening. This way you always have a high-quality file to revisit when the need arises. Other than that, yes–the workflow you outlined looks solid.
You can forgo the sharpening on the large image, but still apply Exposure effects. Then, save a copy as a flattened Tiff for use as a master. That way you won’t need to remake any customized Exposure effects, just perform sizing and sharpening.
[…] tweak to the eyes and lashes. Nothing crazy. Yes, I’m a hypocrite. I recently wrote an article about sharpening as a final step in the workflow. I stand by that, by the way. This was just a […]
I learned to use the marching ants method. That worked perfectly, and like a charm too :-).
But…..this is a great article non the less!
Jimmy is not creating a “Sharpening Law or starting an argument”, he is just trying to help.
Thanks Jimmy.