
Nostalgia. It’s an odd word when you stop and look at it, but also a word that impacts us all. It might be a smell that takes you back to Grandma’s kitchen, an old movie poster that evokes some warm and fuzzy memories, or a song that transports you to a special moment crystalized in your memory. Today’s article is how you can use Exposure to help you to create nostalgic photography. Doing so adds impact, artfulness, and even commercial appeal to your images.
I was recently on a class trip with my youngest son when I saw a perfect nostalgic photography opportunity. The guide had led the children down to a little pond and allowed them to use nets to try to catch the frogs in it. When one was caught, he held it up in his hands for the kids to see. One of my son’s classmates came in close to see with an “ohhhh” on his lips. I snapped the shutter. Here is the shot out of camera:
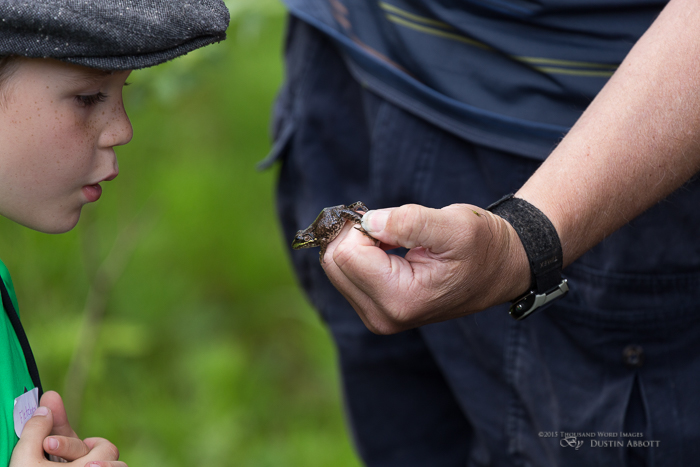
Nice, but not amazing. I was across the pond with a Canon EOS 6D body and a Canon EF 70-300mm f/4-5.6L II lens. It is one of my favorite travel combos because it is reasonably compact and versatile. In this case, however, 300mm did not frame as tightly as what I wanted. The hand of the guide features too prominently, his watch is distracting, there is too much of his clothing and arm (the lightness draws the eye), and even the hands of the little boy are extraneous to the most important connection – the tension between the frog and the little boy’s eyes. So the first step was a crop. I prefer to do my cropping in Adobe Lightroom for the most part; I start there and always return there in the end.
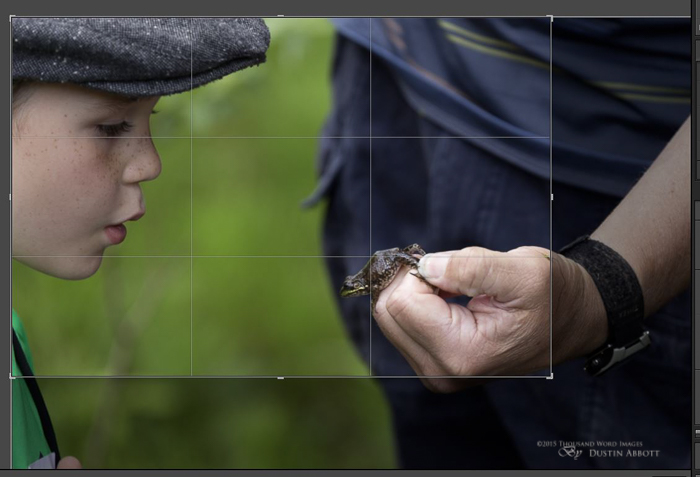
You can see here that I’ve worked at producing a “rule of thirds” connection with the frog at one juncture and the boy’s eyes at the other. My most difficult decision was regarding where to cut off the hand; I didn’t want that to be distracting. Here is a look at the finished crop:
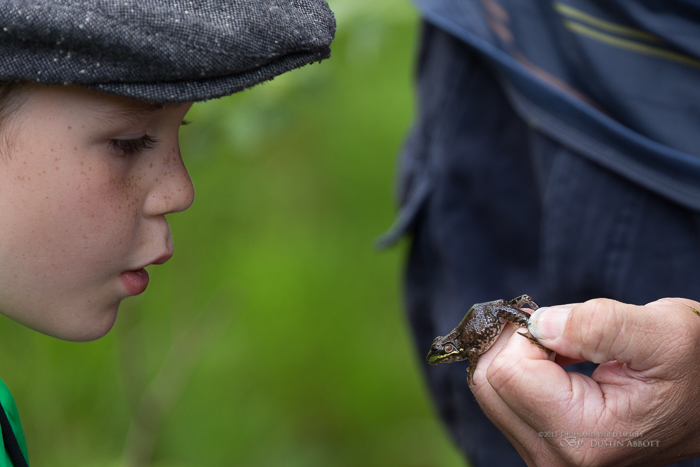
Much better.
There is a very important visual cue here, and that is the somewhat “retro” cap that the boy is wearing. This helps advance the idea of nostalgic photography. As soon as I saw that, my mind made the connection between the vintage cap and the vintage experience of a boy being excited over a frog – nostalgia! I knew the processing needed to match the visual experience to help to transport the viewer to another time and place. And there is nothing like Alien Skin Exposure to make that kind of magic happen.
I typically prefer to launch ASE from Photoshop as it maintains the option to mask and layer. For this tutorial, however, Photoshop is unnecessary as Exposure works equally well launched out of Lightroom or as a standalone product. I right clicked the cropped image and selected “Edit In” then highlighted “Exposure (version)”.
There were three things I knew I needed to accomplish. First, to convert the image into a nostalgic black and white with heavier grain and strong contrast. Exposure has a TON of great B&W Film-look presets, from vintage to modern and slick. These are great tools for creating nostalgic photography, for achieving looks that seem to have been taken in a different era. The second thing I wanted to do was raise the exposure on the boy’s face so that his long eyelashes and intense expression would draw the eye a bit more. Finally, I needed to take the exposure down on the man’s hand a little as his skin was drawing too much light and bringing imbalance to the overall exposure. I waited to do the latter two because different presets change the look of the image and I could make a more accurate adjustment after applying the preset.
In Exposure I began to look under the B&W tab at the standard film presets. Exposure nicely renders in real time the way that each preset will change your image while you hover over the preset thumbnail. I quickly settled on the Ilford XP2 Super 400 because it gave me a nice, fine grain as well as great contrast in the boy’s face and the man’s hand. The man’s clothes have become much less obvious during the conversion, leaving the all-important connection between the boy and the frog front and center.
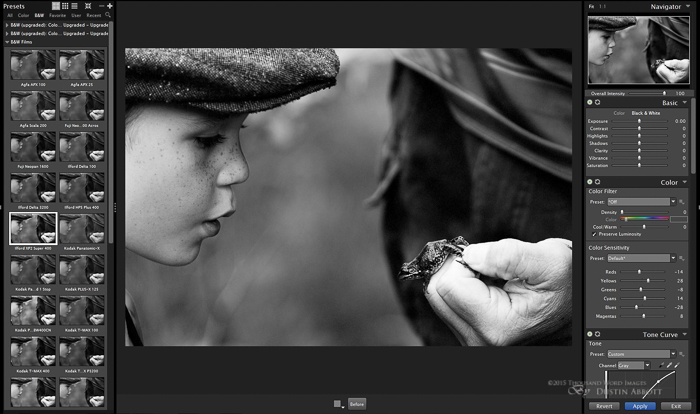
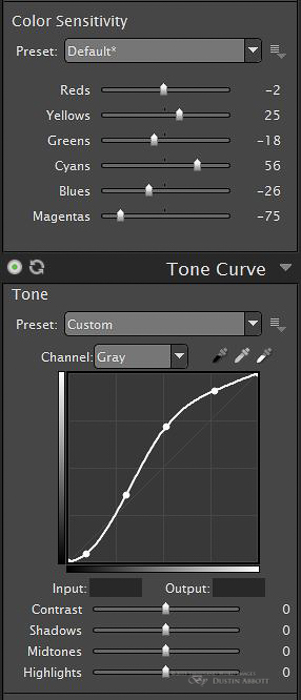
I then made a few minor tweaks to taste to the Color Sensitivity controls on the Color panel (mostly to help the freckles and the boy’s lips pop) and a very minor adjustment to the tone curve (to raise the shadows a hair). Here is a look at my custom adjustments:
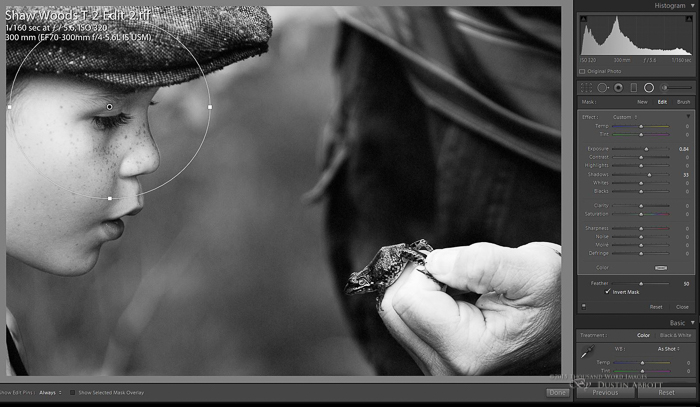
I knew I had my look, so I took the image back into Lightroom. The final steps were quick. I grabbed the Radial Filter tool (Lightroom 5 and later) to add exposure to the boy’s face (I added a little over a half stop of exposure and raised the shadows a little).
I did something similar to the frog so that the detail of his spots and his eyes would become a little more apparent. Finally, I used an Adjustment Brush to paint out some of the brightness of the man’s hand, and lowered the highlights a little.
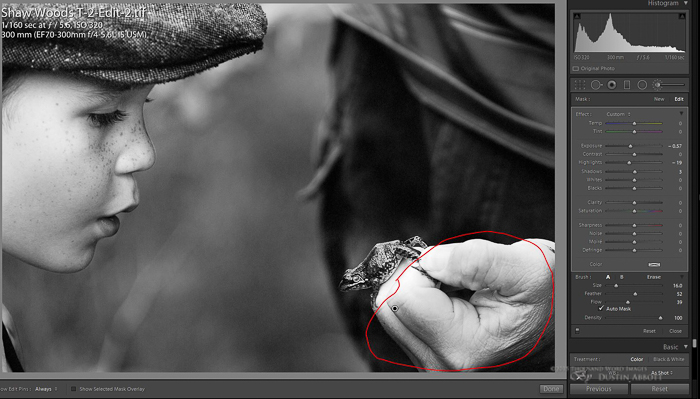
I marked in red the area I dealt with. The end result is the frog gets more attention and the hand gets less. Here is the final result:
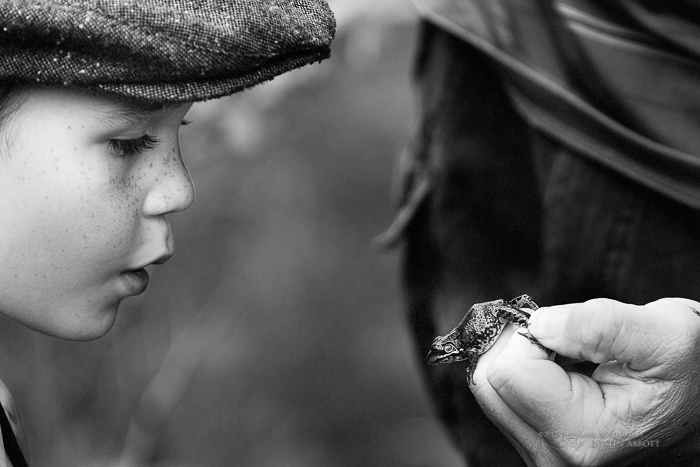
We now have a vintage monochrome that is rich with nostalgia. Many a viewer will remember being excited over a frog as a child themselves. The look of the photo helps stimulate the memory, which is the prime goal of nostalgic photography. I know of no software that can do this as easily and effectively as Alien Skin Exposure. In just a few minutes we have transformed a decent photo into a great one, one which is a perfect example of nostalgic photography. Now go and do the same with some of your treasures!


