
The Tone Curve panel in Exposure has several powerful tools for adjusting image brightness and contrast. It provides you lots of power to quickly change the overall impact of the image. We made this article to show you how to use the Tone Curve panel tools in Exposure.
The Tone Curve panel is located in the lower quadrant on the right side of the screen. Exposure’s default UI layout has it placed between the Color and LUT panels.
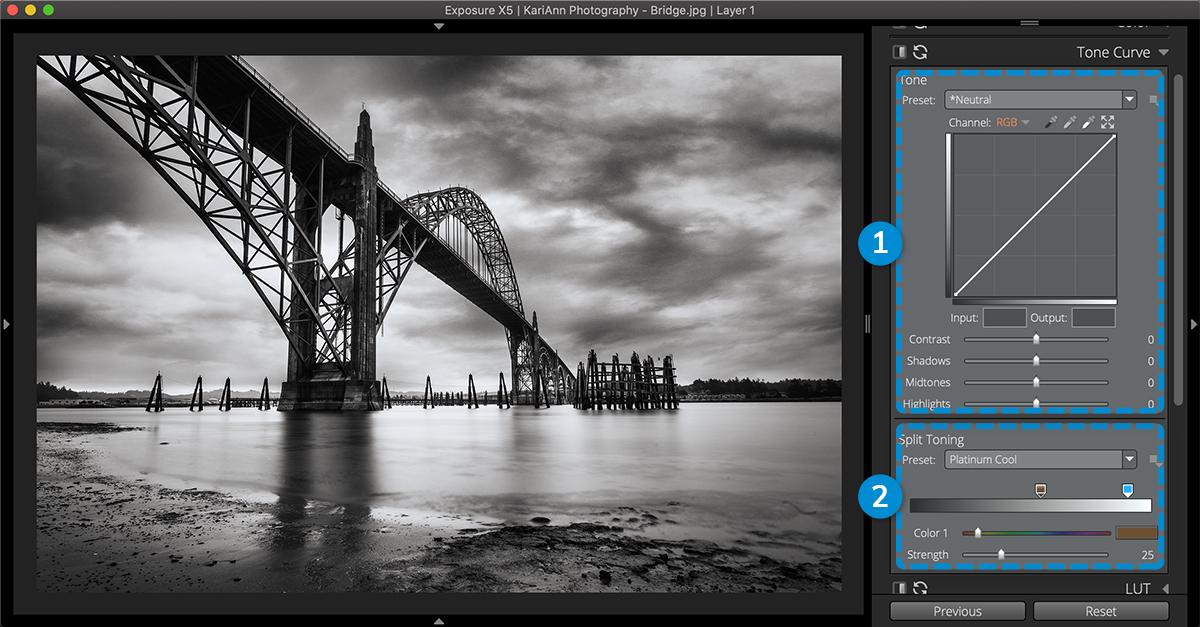
1 – Tone
Apply adjustments using the curve editor. Presets applied in the Tone section only affect Tone parameters.
2 – Split Toning
In the lower section are controls for adding color toning effects. Split Toning presets will only use these controls.
Tone
In the top section of the panel are the Tone tools. These include the Curve Editor and a set of sliders. The tone curve represents all of the values in the photo. Apply adjustments to the curve for control over the lightness and darkness of various parts of your photos. Use the sliders to make refinements to the curve values.
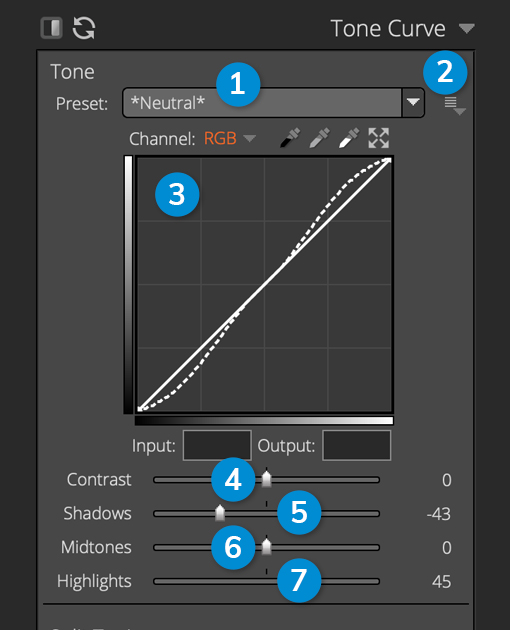
1 – Tone Preset
Displays the selected tone curve preset. Click to browse and apply available customizable tone curve presets. This includes any custom presets you have saved.
2 – Menu Button
Save, delete, and rename tone curve presets.
3 – Curve Editor
The Curve Editor is a powerful tool for controlling the brightness and contrast of an image. Edit the curve to make your images brighter or darker, and affect the contrast. Adjust the curve by adding control points. Move control points on the curve to make changes, or use the sliders to raise and lower sections of the tone curve.
4 – Contrast
Adjust contrast in the curve independently from control points with this slider. Increasing contrast in the image will create a steeper region at the midpoint of the curve, creating a more dramatic separation between light and dark areas in the image. Flatter curve sections represent areas of lower contrast.
5 – Shadows
Lowering this control will intensify dark shadows; raising this slider will make the image look faded. Note the dotted line below the curve from the Shadows slider value.
6 – Midtones
When you adjust the Midtones slider, it moves the midpoint of the curve up or down. That will make the overall image lighter or darker. Additionally, Midtones adjustments will increase contrast in values at the ends of the image’s tonal range.
7 – Highlights
Adjust the highlight values in the photo without going beyond the image white point. The Highlights slider will only modify the brightness within the boundaries, it will not go past the white point value set for the image. Note the dotted line above the curve from the slider value in the example.
These tools are great for adding punchy contrast and vibrancy to photos. The opposite effect can also be achieved to even out exposure by darkening the highlights and bringing up the shadows. The sliders on this panel control the curve independently of control points in the curve editor. Adjustments appear as dotted lines in the tone curve.
Curve Editor
Add control points to the curve to manipulate lightness and darkness of various areas in photos. The bottom axis of the graph is the tone, with shadows on the left and highlights on the right. The vertical axis represents the lightness of given tones, with dark values on the bottom and bright values at the top.
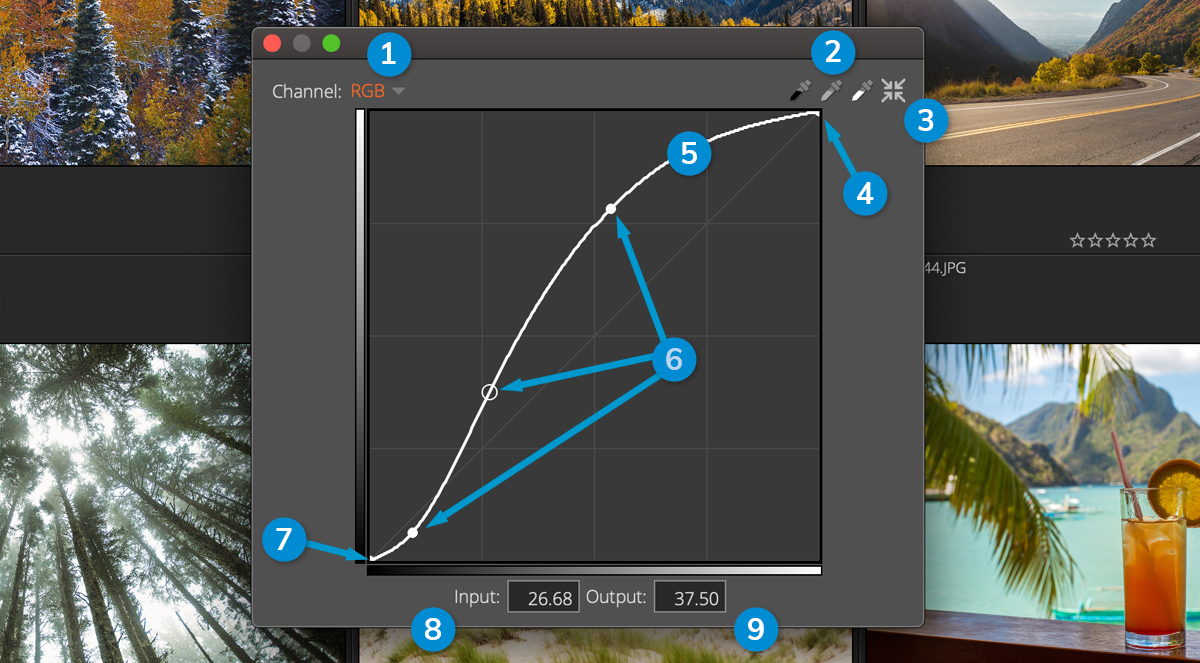
1 – Channel
Select color channel curves. Curves can be applied to all channels together in an image, or to each channel individually.
2 – Tone Curve Eyedroppers
Define pure black, 50% grey, and white values in the image with these eyedroppers. Sample the appropriate tone in the image, and Exposure will automatically adjust the image tone and color based on that value.
3 – Curve Editor Window
Click to open a resizable view of the curve editor. A larger view simplifies working with points in the curve. When open, select the same button to send the curve editor back to the panel.
4 – White Point
Brightest value in every image. Lower this point to decrease the impact of blown out highlights.
5 – Curve
The curve is a line representing the tone vs brightness values of the image. A straight line represents no adjustments are applied to the image. Adjustments made with the sliders on this panel will display as a dotted line in the graph.
6 – Control Point
Add, edit, and delete control points along the curve to modify image tones. The selected control point will be an outline rather than a solid dot.
7 – Black Point
Darkest value in every image. Raise this point to create a faded look with milky blacks.
8 – Input
Lists the brightness value of the selected point on the tone curve. Curve adjustments are specified as a function from input level to output level.
9 – Output
New brightness value of the selected point with tone adjustments applied.
Click on the tone curve to add a new control point. Move control points to make changes, including the black and white points at the ends of the curve. Drag upward to brighten the value and downward to darken it. Move laterally to select different tone ranges. Drag unwanted control points outside of the editor to remove them from the curve.
Split Toning
Toning in photography is the addition of a color to a photograph without changing the image brightness. Split toning is a variation of toning where separate colors are added to specific values in the photo, such as the highlights and shadows. This adds a level of perceived sophistication to the image, and can enhance a cinematic mood. For example, Sepia toned black and white photos have a recognizable vintage brown look.
Applying Split Toning Effects
There are lots of fully customizable split toning presets in the dropdown list. Select one of the preset options and then make adjustments to customize the effect.
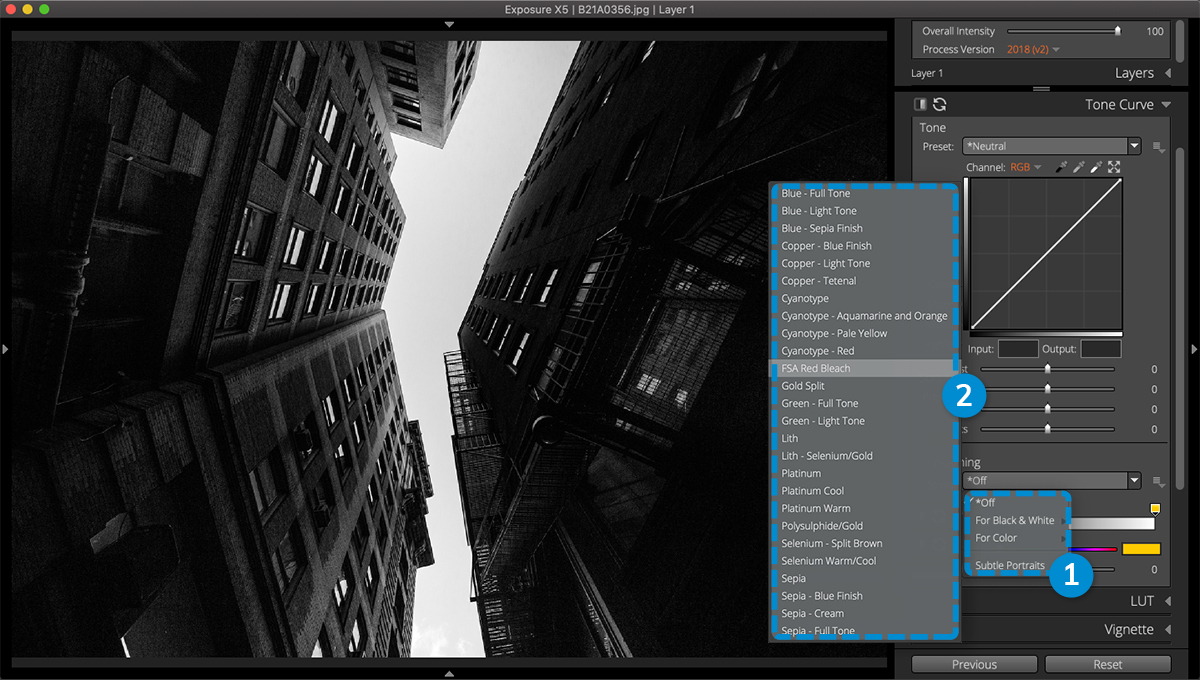
1 – Preset categories
When saving custom toning presets, create categories to organize with submenus. The example displays preset categories for black and white, color, and a user-created Subtle Portraits category.
2 – Toning Presets
Hover over toning presets to preview the effects on the image. Select a preset to apply it to the image.
Adjusting Toning Parameters
Control the appearance of split toning effects with these simple controls. Select each color stop and adjust its strength, color, and the tones that it affects. To only apply a single tone, set the strength of one stop to zero.
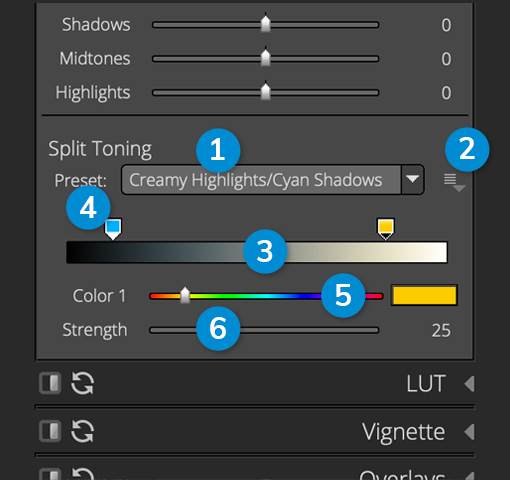
1 – Split Toning Preset
Lists the selected preset. Click to browse and apply customizable split toning presets. This includes any custom split toning presets you have saved.
2 – Menu Button
Save, delete, and rename split toning presets.
3 – Gradient Strip
The strip represents the luminosity range of the image, or the measure of brightness in the image’s values. It is easy to visualize with black and white images. Light areas are represented by the right side of the strip, and dark tones are on the left.
4 – Color Stop
Drag each color stop to designate the tones in the image where it is placed.
5 – Color Slider
Control the hue of the selected color stop. Click the color chip on the right to access advanced controls for selecting the toning color.
6 – Strength Slider
Adjust the amount of toning applied by the selected color stop.
As you can see, Exposure offers robust tools for tone curve adjustments, and split toning effects. Thanks for reading our guide. We hope you learned something new about using the Tone Curve panel.
Save a link to this page if you need a reference for making adjustments with the tools on the Tone Curve panel.


