
Adding watermarks to your photos is a great way to put your creative mark on your work. Watermarks provide a way to showcase your brand, and ensure that your work is not used without your permission. We made this guide to demonstrate how to create and apply watermarks to images in Exposure.
What is a watermark?
Watermarks take the form of semi-opaque images placed over the original photo. They may include your name, studio information, technical details, or your logo. Watermarks are a great way to establish your brand and connect with people that appreciate the work you do.
Adding watermarks to images is usually one of the last steps of the photo editing process, when exporting finished files. In Exposure, open the Export dialog with the menu or with ⌘+E or Ctrl+E. Watermarks can be assigned in the Metadata section.
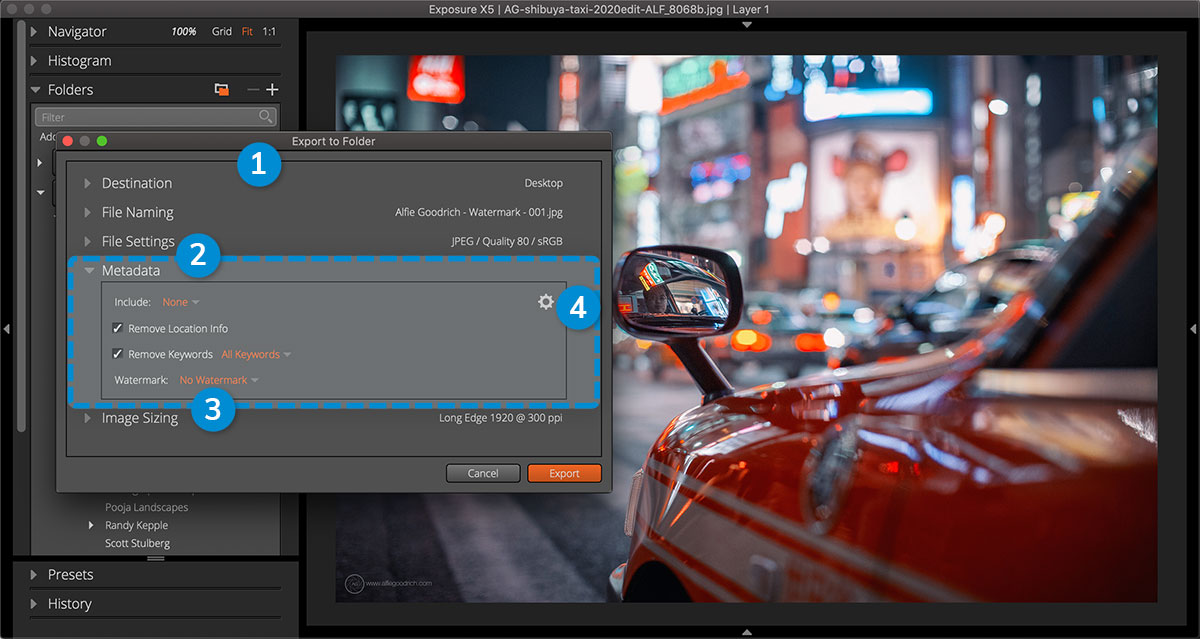
1 – Export to Folder Dialog
Set parameters for the handling of exported files, such as the save location, file type and settings, image size, and more.
2 – Metadata
Select to include metadata information about your studio, photos, and camera system.
3 – Watermark
Select a watermark preset to apply to exported files.
4 – Metadata Presets
Choose from presets that control the information embedded in exported files. These presets include parameters for all the tools in the Metadata panel, including watermarks.
Applying Watermarks
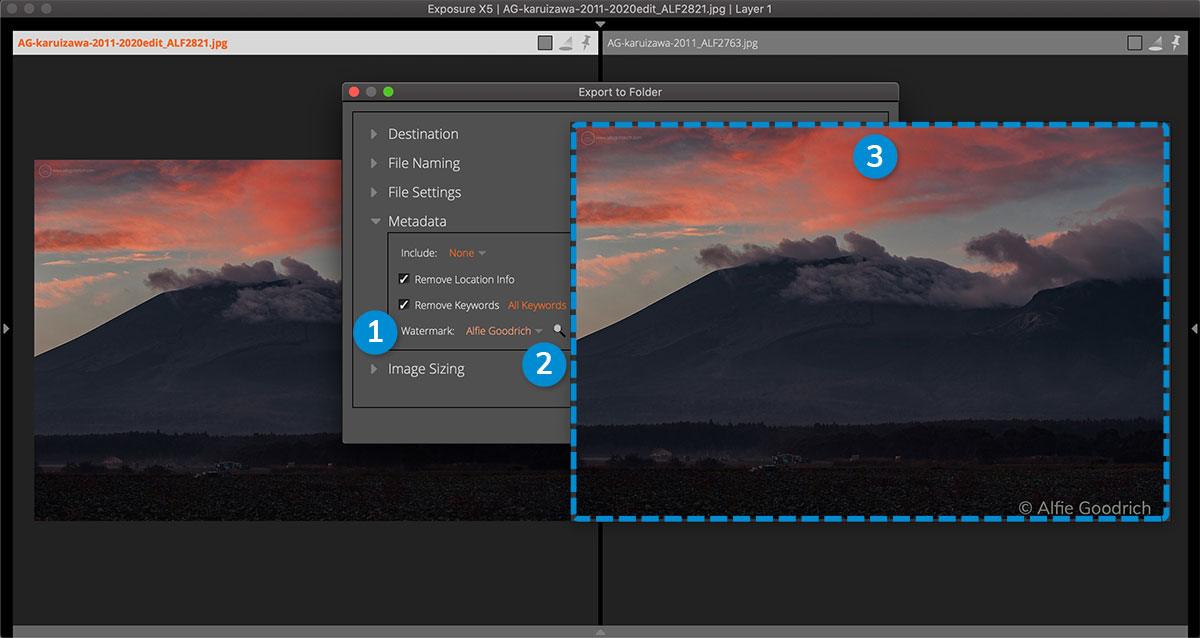
To apply a watermark to your images, select a preset from the dropdown in the Metadata section. When selected you can then preview the watermark on your image for sizing, placement, or other considerations.
Watermark presets can be placed into categories to stay organized. The insignificant amount of effort it takes to keep them tidy is a great way to keep your workflow quick and efficient.
1 – Watermark Preset
Lists the selected preset. The example uses the Alfie Goodrich watermark.
2 – Preview Icon
Hover over the magnifying glass to open the preview window.
3 – Preview Window
Displays how the watermark will appear on exported images.
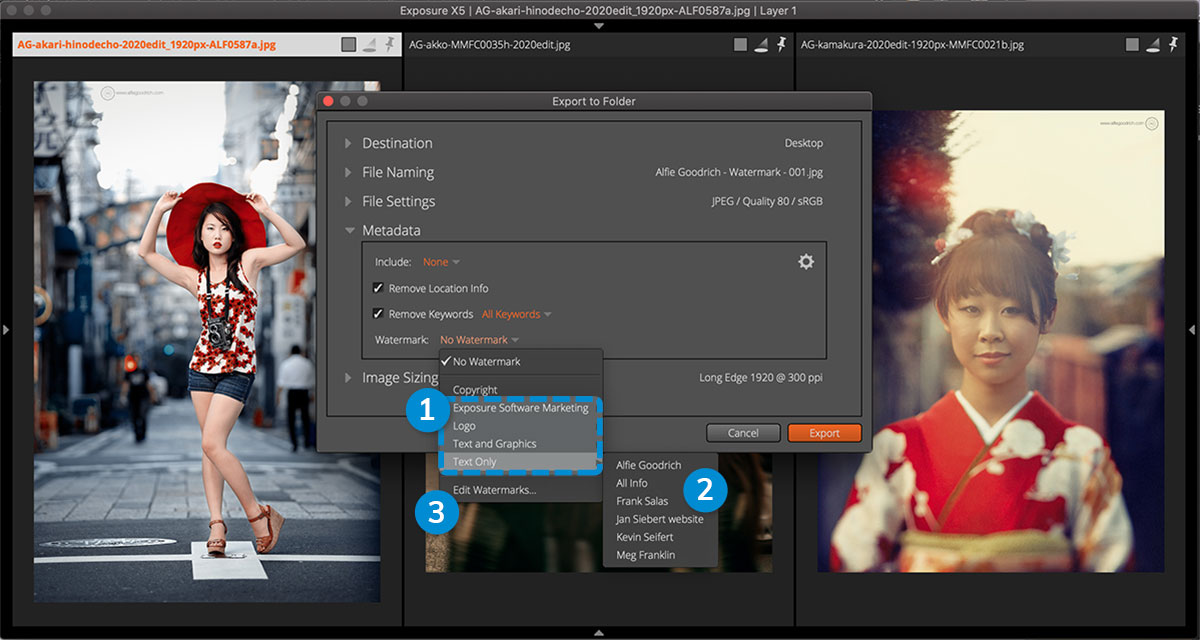
1 – Watermark Categories
While saving custom presets, create categories to organize them. The example image lists preset categories organized by watermark item type.
2 – Watermark Presets
Select from the watermark presets you create.
3 – Edit Watermarks…
Click to open the Edit Watermarks panel where you create, edit, and save custom watermarks.
Designing Watermarks
Control the appearance of watermarks with the tools in the Edit Watermarks panel. Add separate items to develop watermarks with your own style. There are three watermark items available. Any designs can incorporate any number of text, images, and metadata items in various arrangements.
Save watermark presets for different uses, such as simply placing the studio name, or copyright to image. Another suggestion is to create a watermark that includes the image filename for use when printing contact sheets. Integrate watermark presets into your export process and save lots of time.
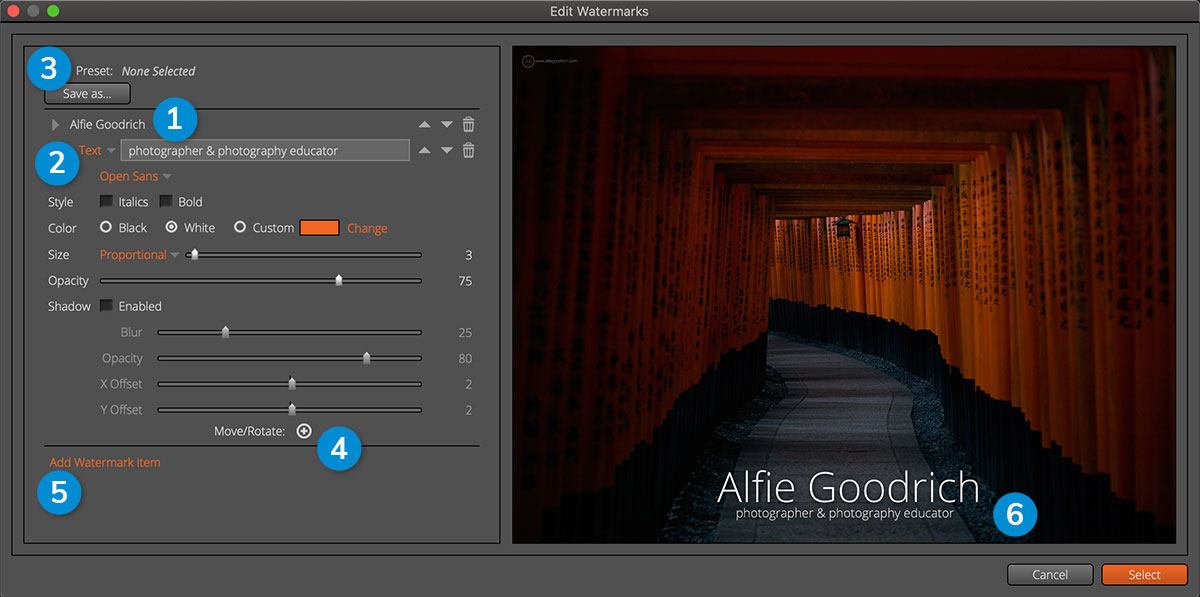
1 – Watermark Item
Collapse the watermark tools when working with multiple items.
2 – Item Type
Set the item type. Use Text, Image, and Metadata watermark items.
3 – Save As…
Define the parameters set in the panel as a custom preset.
4 – Move/Rotate
Select and manipulate the placement of watermark items on the image.
5 – Add Watermark Item
Add an additional watermark item to include more information.
6 – Preview
Display of the current watermark settings on this panel.
Text Type
Text items are simple to use and control. You can place several lines of text on your photos. Each text item will have its own set of controls for font, style, size, and color. Set parameters for each item to create sophisticated arrangements. Once created, save the watermark as a preset and use it for exporting.
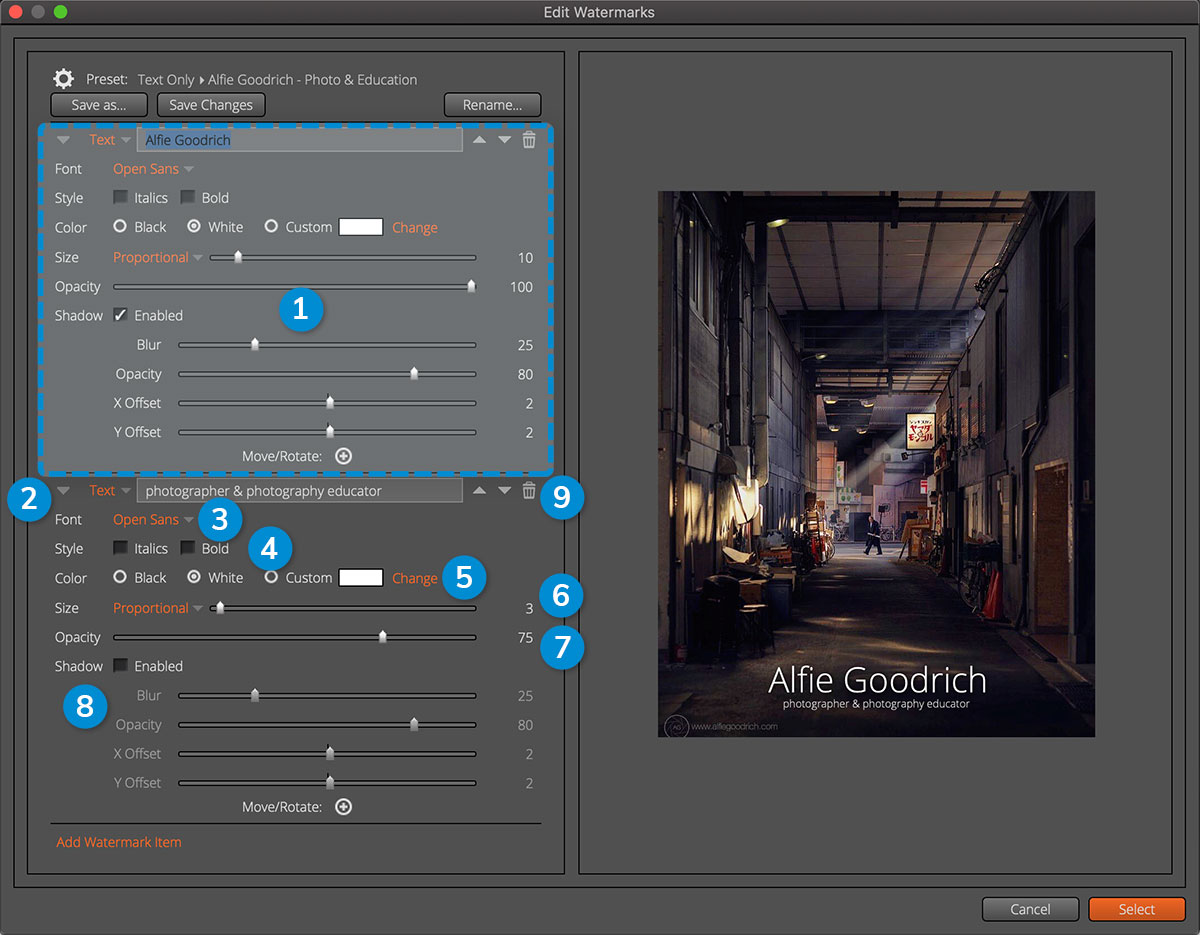
1 – Text Item
Set these parameters to control the watermark items’ appearance.
2 – Disclosure Arrow
Hide or disclose the panel for each item. It’s a great way to save space on the screen.
3 – Font
Select from the fonts installed on your system.
4 – Style
Format the type for emphasis with bold or italics.
5 – Color
Set the color of the text. Click the color swatch or the Change button to define a custom color.
6 – Size
Scale the text with this slider. Use Proportional scaling, Fit to width, or Fill to height.
7 – Opacity
Set how much of the applied text you see. Lower the opacity to soften the appearance of the watermark item.
8 – Drop Shadow
Add shadow effects to emphasize the text items.
9 – Delete
Remove the watermark item.
Image Type
Image watermark items are useful for branded studios. Use this type of item to import and place logo files. Access previously imported image files from the menu, or select one from a new location. Set parameters to place and blend the image file. Flexibly combine various items together to design and create watermarks.
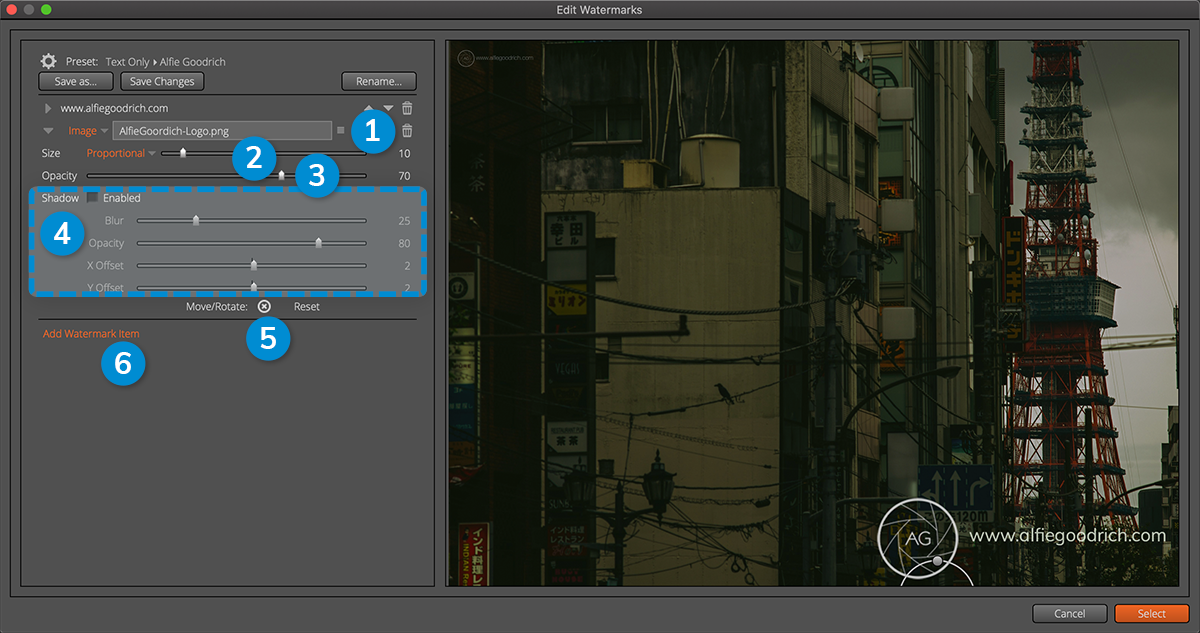
1 – File Selector
Import PNG, JPEG, and TIFF images. Use PNG and TIFF for areas of transparency.
2 – Size
Scale the image.
3 – Opacity
Set the percentage of how much of the image is visible.
4 – Drop Shadow
Emphasize the image with the added dimension from a shadow effect.
5 – Move/Rotate
Relocate and position the image item.
6 – Add Watermark Item
Place more items for the watermark design.
Metadata Type
Metadata watermark items automatically place data on the photo. Metadata information is usually written to images before editing begins. See our Opening Images video for more details on writing metadata to photos.
Metadata watermark items can include information such as copyright, studio name, or website url automatically. These items can also include technical information about the photo, such as the f-Stop and ISO, or the camera, lens, and serial number.
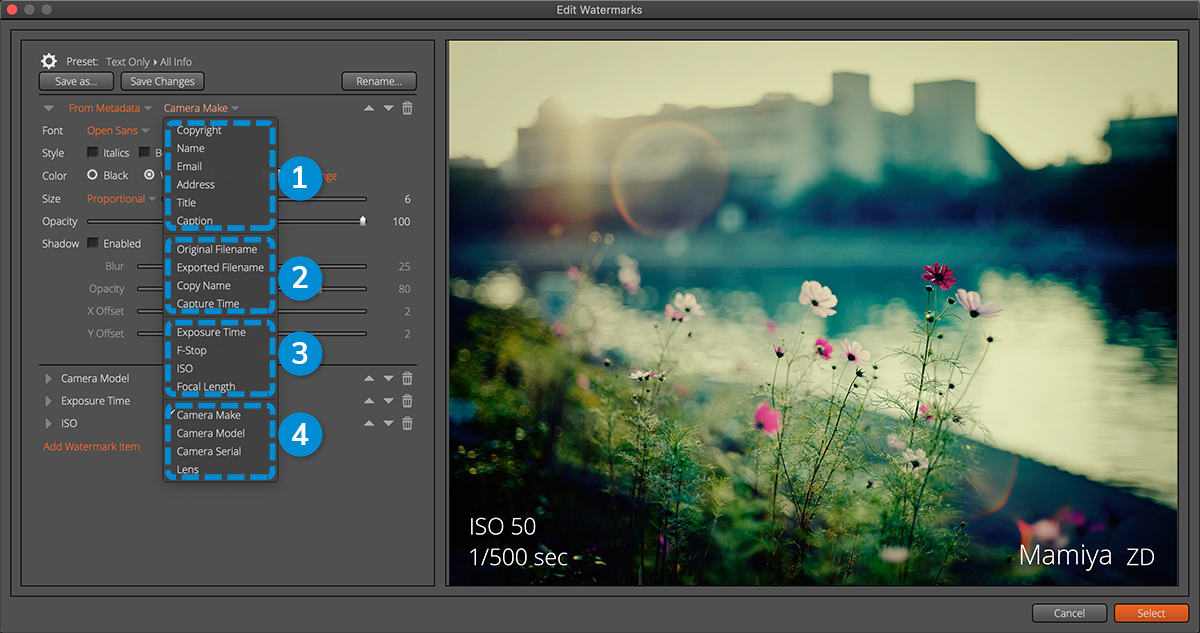
1 – Studio Information
These fields are defined when importing images.
2 – File Data
Include file data on each image. File information, such as the image file name, is useful when communicating with clients to select finals.
3 – Photo Data
Include information about the camera settings of each capture. This is helpful for educational purposes such as writing a blog article.
4 – Camera Data
Include information about the camera gear used to capture the image.
As you can see, Exposure offers robust tools for creating beautiful watermarks for your images. And when exporting photos, you can have Exposure apply them to images for you automatically. This is another great way Exposure’s design saves you time.
Thanks for reading our guide. We hope you learned something new. If you ever need help adding watermarks to your images in Exposure, save a link to this article.


