Blend modes are extremely useful. Unfortunately, they are often misunderstood. This feature of Photoshop can make editing much easier. I recommend that you make it part of your everyday toolkit.
In a nutshell, blend modes control how colors mix. Most often they are used on a layer to modify the coloring behavior of the layer(s) beneath.
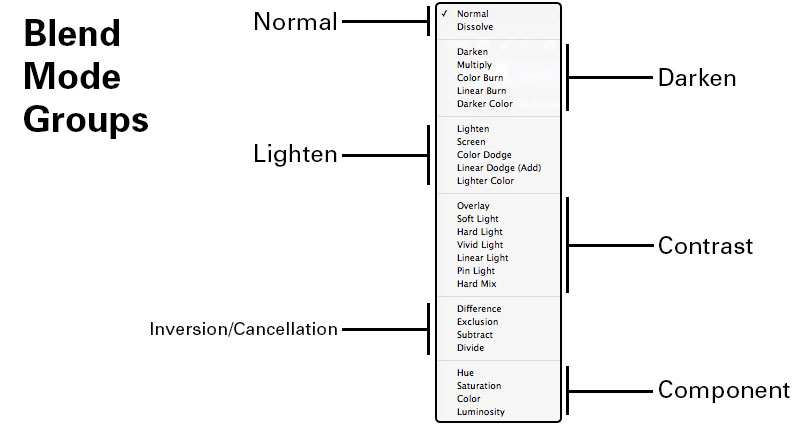
The modes are always separated into behavioral sections when displayed. There are only six sections. You don’t have to memorize the entire list. When you understand the basic behavior of each section, the modes become easy to use. Take a look at the list from the Layers Panel.

Other Uses
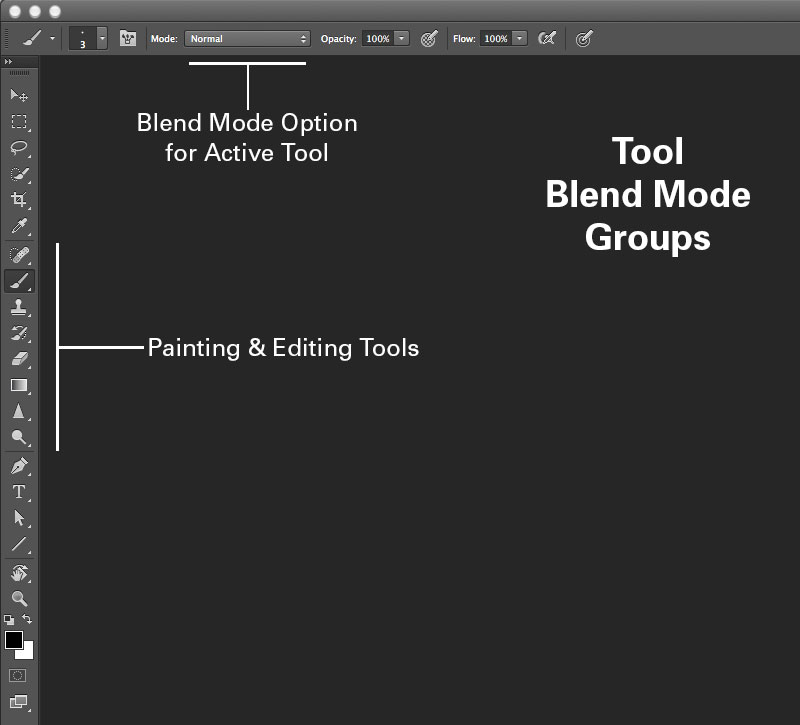
Blend modes are not just for layers. You can use them with the Painting and Editing tools such as Clone Stamp, the Healing Brushes, the Brush/Pencil tool, the Blur and Sharpen tools, and more. When you select your tool, a mode drop-down will appear on the Options bar at the top. Here’s a screenshot.

Useful Shortcuts
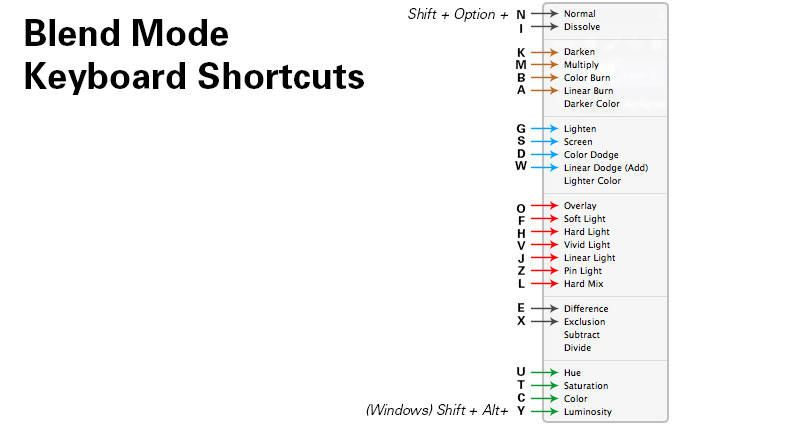
Working with blend modes is a process of experimentation, which can burn up a lot of time. There are many keyboard shortcuts to speed things up. While using the move tool (V), press Shift+ or Shift- to quickly scroll through the modes list. Below is a cheat sheet of keyboard shortcuts for most of the modes. Remember that if you’re using a tool, the tool mode will change in the Options bar.

Applications
Here is an example of using the Spot Healing Brush for skin retouching in Lighten vs Normal modes. Lighten mode makes the dark areas in the skin become significantly lighter, while the bright areas are only slightly lightened. This helps to keep the image from losing detail and looking muddy.

Below is an example of using the Clone Stamp for thickening up a scalp spot in Multiply vs Normal modes. Darkening this light spot with the Multiply mode retains the hair texture in the original photo. Normal mode covers up the spot with hairs in random order, making it tough to line things up just right without repetition.

The color mode is useful when you want to make color adjustments to a specific area of a photo without losing detail. In this example, I changed the eye color using a solid color and then again with a gradient.

Try Exposure Today


Thanks for that very useful info,never thought about using blending modes with anything but layers
Rob
Hi. i am so excited that you have written about Photoshop Blend Modes and looking forward to finding time soon to read what you have written! Blend Modes are my favorite tools to use in Photoshop for they often lead me to ironic designs!
Thanks again and Very Best Wishes,
Carol Goodell
PixelArtist@comcast.net
This topic is very interesting to me as I am a designer not for a long time. I have found an ultimate guide to blending modes in photoshop and I want to share it with newcomers in this area, like me: http://photodoto.com/how-to-master-blending-modes-in-photoshop/
[…] layer, I’ll perform a couple of touch-ups with the healing brush [J]. I usually set the brush to Screen, Multiply, or Lighten depending on the skin tone, but it’s not always […]