Steve’s recent review of Exposure 5 is a great, comprehensive article. We liked it so much that we thought we’d share it with everyone. It was originally published in Photo Technique magazine’s September/October 2013 issue. Thanks a million to Steve Dreyer and everyone at Photo Technique!
—
Alien Skin Exposure 5
By Steve Dreyer
I often look at my twin lens Rolleicord and old Kodak and Nikon F3 film cameras that sit proudly on the shelf in my office. The shelf is situated to my left as I walk towards my desk where I have all my digital equipment−almost to remind me of the way it was! There was just something special, even magical, about the feeling I had when I picked these cameras up to photograph something and later went back to my darkroom or over to a custom lab to see the images come to life.
But now I use DSLRs and post-processing to achieve my vision. Software programs are getting better all the time, as they incorporate algorithms for adjusting sharpness to noise to everything in between. The programs we use are, or should be, dictated by what we want to accomplish, possible client or gallery requirements, and the ease of use and control that they give us to create that final image−our vision of the scene we saw when we pressed the shutter. However, I still love the look of film and that’s why I jumped at the opportunity to experiment with the latest Alien Skin Exposure version 5.
For those that are not familiar with Alien Skin Software, the company has been known for its quality products since the mid-1990s. Even so, the products are very far from “old tech” as the company has continually innovated over the years. Their attention to meeting customer requirements, support and great software is what defines them.
Software companies work hard to differentiate their products, and it’s not easy to be unique in a world that provides photographers with so many choices. But the latest version of the Alien Skin’s Exposure product does just that. I’ve spent quite a lot of time with this version and this article describes just a few of my favorite features with examples of how I used them.
Exposure 5 Features
Version 5 expands on the ease of use and rich feature set of previous versions of the software. For example, the new darkened background and panel interface resembles the look of Adobe Lightroom and Photoshop. It’s easier to use than previous versions and if you use the Adobe products it feels more like part of the general workflow. An important feature is that you can also use Exposure 5 as a standalone product, so Lightroom and Photoshop are not even required. Just open Exposure and select the image file that you want to work on. Contrary to the way some other tools work, you can access all the color and black and white presets and controls from the same interface−there’s no need for separate products. This means that you can more easily experiment to achieve your vision of the final image.
As in previous versions, the left panel is where you select from the included “presets” for your work. I use them as starting points because they have been researched and developed specifically for the look of film. There are even some films that I never heard of and it’s actually fun to experiment. I may still make further adjustments with the sliders in the right panel. And you can create your own presets after you’ve customized the ones that are included with the product, which means that you can easily apply a consistent effect on a set of images from a shoot−with the click of a homemade preset. Here are just a few of the many things that I like about Exposure 5, with some examples.
Black and White Film Simulation
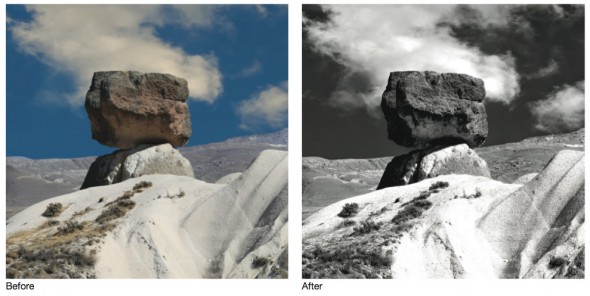
The opening images−the before (color) and after (black and white) provide just one example of the many black and white film effects that are available. I thought the color image that was right out of the camera was okay, but it wasn’t that special and didn’t represent the look I desired. I wanted an image that would show the lines and detail of the rock and landscape against a darkened sky.
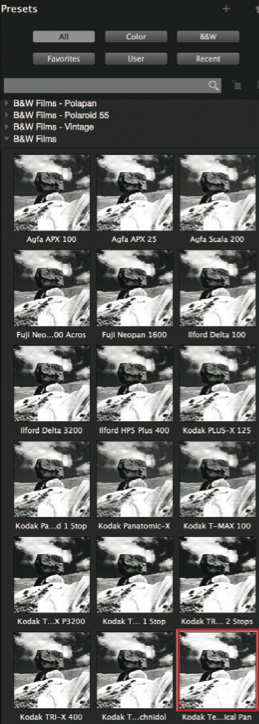
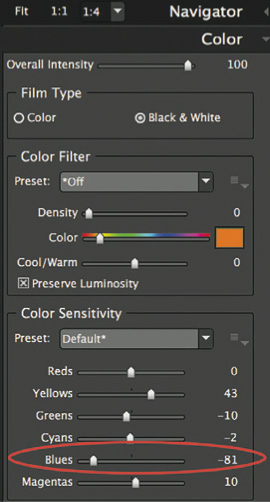
I could have created the black and white version in Lightroom, Photoshop and/or with certain other plug- ins. But with Alien Skin Exposure, it took me less than two minutes to achieve the film effect that I wanted. Figure 1 shows the left panel of Exposure 5, where I selected the Kodak Technical Pan film. Because I wanted an even darker sky without affecting the white clouds, I moved the blue slider in the right side panel (Figure 2) to the left (effectively darkening only the blue), and that was all that was necessary.
Color Film Simulation
Like many other photographers, my go-to color film was Kodachrome 64, especially for its richness and depth of the color. Alien Skin Exposure 5 not only has a great simulation for this film, as it does with all included color film presets for Agfa, Fuji, GAF and many others, but it allows for even further adjustments. Figures 3 and 4 show an original RAW format image and the final Kodachrome image respectively, after applying a few sliders in the right side panel. And just because it took only a second, I applied a Tri-X treatment (Figure 4) to see how that would look.
You can see some film grain (as distinguished from noise) that was added to this image. It can be achieved naturally by using certain films (as in the case of Tri-X) and in the development process. Exposure 5 lets you easily add a grain effect and has sliders that allow you to control the amount, the size and how the grain will be applied in shadows, midtones and highlights.
Borders and Textures
There is a section in the right panel called Borders & Textures, which is a convenient way to further stylize images. Although there are presets in the left panel that automatically incorporate some of these effects, you can select a preset as a starting point and then add an effect from the right panel. It’s that easy, and you can experiment for the effect that’s most pleasing. As with other right panel adjustments, they can be applied to the provided color and black and white presets or your own creations.
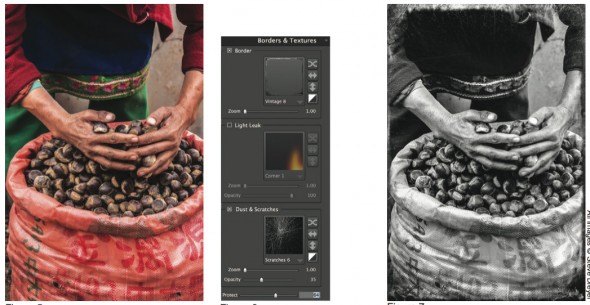
Figure 5 is a color version of a woman handling chestnuts at an outdoor market in Asia. It is the result of applying the Kodachrome 25 preset to an eight megapixel RAW image taken several years ago with no other adjustments. Selecting a black and white preset can give this type of image an “old” feeling. I selected Tri-X, added some scratches and a vintage border from the adjustments in the right panel (Figure 6) and wound up with the photo in Figure 7. Note that there are no scratches in the center of the image−there’s a convenient “protect center” option that eliminates the effect in that area.
Summary
The effects described above and the many more that exist are a click and optionally a slider away. Aside from the technical and artistic benefits of Exposure 5, it is really easy to use. In fact, it can stimulate your creativity. Mousing over an effect in the presets in the left and right panels gives you a glimpse of how the image will look if you apply the effect. This feature gives you live view flexibility in your quest for achieving your vision.
You don’t have to want a film effect to get the benefits of Alien Skin Exposure. But if you do, this is a must-try product. What’s interesting is that while I use other products for some of their unique features and functions, I now find myself opening Exposure 5 on almost every image−even before I use the others.
Exposure 5 has rekindled my love of film, albeit without the expense, chemicals or the effort. Alien Skin Software has a tagline for its Exposure product: “taking the digital out of digital photography” and I couldn’t agree more!
—
Steve Dreyer is a fine art photographer based out of New York. He is a contributing writer for Photo Technique magazine, and he leads workshops for B&H Photo. See more from Steve on his website and his blog.
Try Exposure Today







Hi Jimmy,
Thanks for the kind comments on my article in Photo Technique. As the review states, I am a big fan of Exposure 5 and use it regularly to bring back that look of film!
Thanks again…..
My pleasure, Steve!
In fact, when someone doesn’t understand other visitors to help.