
Film grain is the random visual texture of processed photographic film. The appearance of grain effects can be widely varied, from the chunky grain of a vintage black and white look, to a subtle grain that barely kisses the highlights. Exposure enables you to add realistic grain effects to your photos, including presets that give the look and feel of real analog film. We made this guide to show you how to control grain effects in Exposure.
The Grain Panel
Exposure’s Grain panel is located in the lower section of the right dock. By default, it’s found between the Focus and the IR panels. You can easily hide and relocate panels according to your workflow preferences. Learn more about configuring Exposure’s UI in this user guide.
Grain Controls
Grain presets are great starting points when applying grain effects. Hover over the looks in the dropdown menu to preview their effects on the selected image. Click to apply a preset, and then customize the grain with the sliders.
When applying grain effects, zoom the view to 1:1 or 100% magnification. This gives you the clearest view to evaluate the shape and amount of grain in each range of tones in your image.

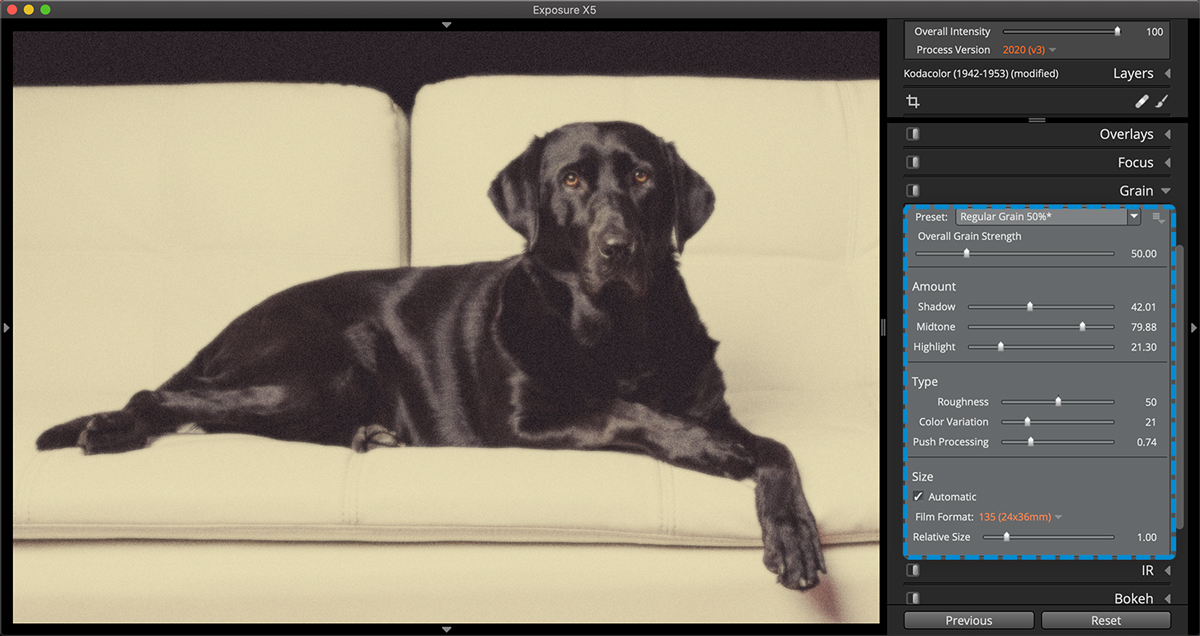
1 – Grain Preset
Image file information is displayed in this group. The name, copy name, image dimensions, and other attributes can be customized, here. The capture time can be adjusted for individual files, and groups of images.
2 – Menu Button
Save, delete, and rename grain presets.
3 – Overall Grain Strength
Control the overall visibility of grain in the image. Adjusting this slider is a good way of making grain more visible or subtle without changing the grain shape and distribution.
4 – Amount
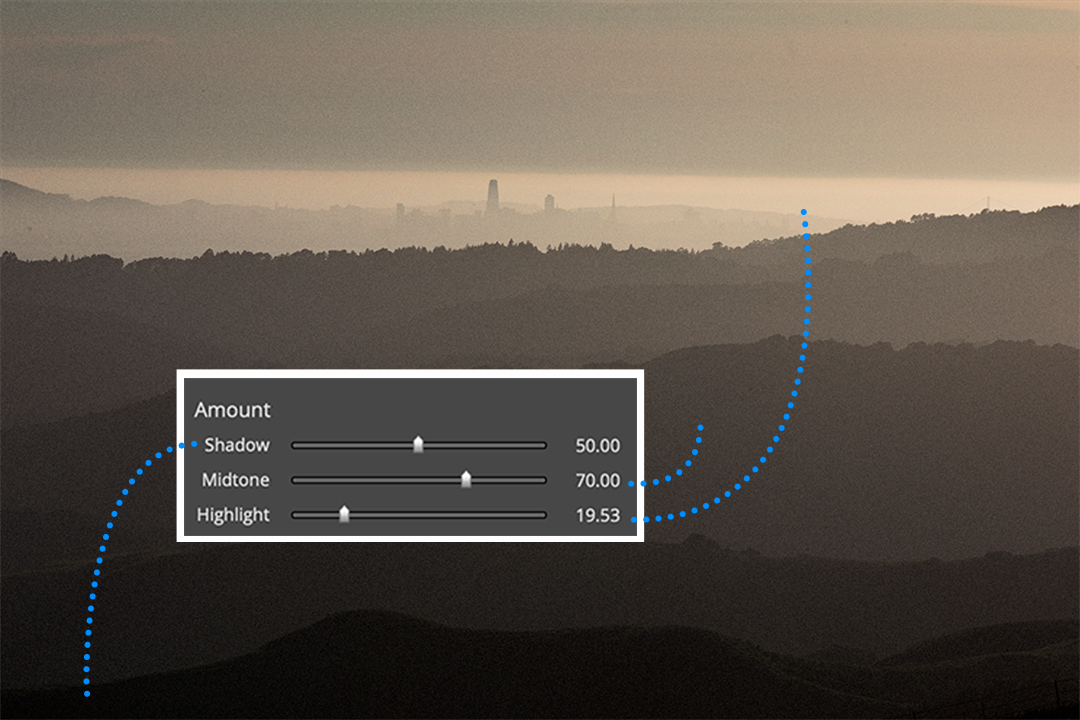
Adjust these sliders to control how much grain appears in the highlights, midtones, and shadows separately.
5 – Roughness
Changes the contrast of visible grains.
6 – Color Variation
Increase the visibility of color in the grain effect. If you prefer monochrome grain, set this slider to zero.
7 – Push Processing
Push Processing simultaneously intensifies the amount of contrast in the image and the visibility of the grain. It is useful for simulating darkroom techniques to enhance sensitivity of film by increasing the time spent in developer chemicals.
8 – Size
Enable the automatic checkbox to set grain size based on specific film formats. Then move the relative size slider to adjust the size of the grain lumps relative to that film format. With Automatic turned off, adjust the pixel slider to directly set the size of the applied grain.
Emulating Real Film Grain
When simulating grain effects from real film, consider the following criteria: where the grain is present in the image (such as in a specific tone or hue), how much of it is visible, and what it looks like. Exposure has controls for each of these aspects of the effect. Additionally, Exposure will adjust the grain placement if edits are made to contrast or exposure.
Clumpiness
Individual film grains can only be seen with a microscope. The little fractal lumps you see in film are clusters of many overlapping grains. We use the term “grains” when referring to the visible lumps, since that is what most people mean.
Distribution
One secret to the great-looking grain in Exposure is the irregular clumpiness. Real film grains clump together beautifully, but not in a rigid structure like digital noise. Grain lumps that are distributed randomly will look most natural to the human eye. Some film stocks will show more grain in highlights, while others show them in midtones, or shadows. Control the distribution of the grain with the Amount sliders.
Roughness
One of the basic rules for grain is the faster the film speed, the greater the tendency towards graininess. Developer and developing temperature can also affect the visible graininess in film. To simulate a grainy film, use higher values of Roughness and introduce Color Variation.
Push Processing
One film photographer technique for getting the most out of shooting is to adjust the film speed with chemical processes. Pushing and pulling film (increasing/decreasing light sensitivity) is a darkroom technique that enhances the film’s tonal range. Take a 400 speed film, for example: if it were pushed to 1600 speed, the film grain would be more pronounced and the image would have increased contrast. Use the Push Processing slider to increase the appearance of grain and add dramatic contrast.
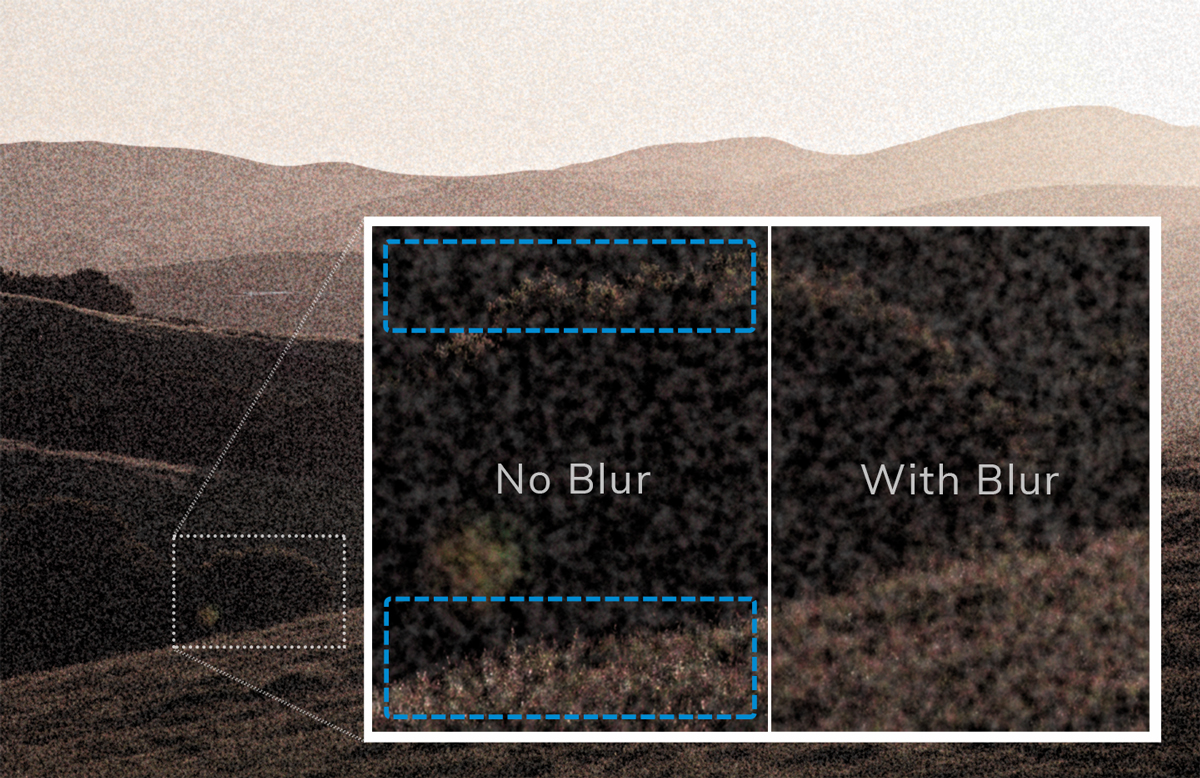
Blur
The sharpness of film is the perception of good edge distinction (acutance) between details in a photo. With real film, if you make a huge enlargement, you won’t see any detail smaller than the grain size. It’s the grain itself that makes the details. One of the easiest ways to see if film grain is fake is if image detail is smaller than the grain. Real film will be blurry beneath the grain.
As you can see, Exposure offers a wide selection of tools for creating beautiful, realistic-looking grain effects to your images. Thanks for reading our guide. If you ever need help applying grain to your images in Exposure, save a link to this article.


